Category Archives: Windows Server

Compress files on windows via Command Line

Hi,

There are time we want to perform things via CLI. Today I encountered to perform compression via CLI for my windows machine as it has problem performing the task via the UI. Here are the codes:

  • Compression

compact /c /s:”full path of folder” /i /Q

  • Uncompress

compact /u /s:”full path of folder” /i /Q

That’s it

Source: https://www.tenforums.com/tutorials/26340-compress-uncompress-files-folders-windows-10-a.html
Seafile SSL/HTTPS on IIS

Seafile SSL/HTTPS on IIS was a very interesting journey when I was trying to implement such change as it gave me some interesting facts that I have notice not well documented. In this article we will assume that you have already installed a running instance of your Seafile on your Windows Server but was server via HTTP only. So lets get started:

Additional Assumption

  • Seafile is running on its default ports 8000 and 8082
  • You already know how to get a SSL Certificate and Apply it on your SSL

Settings for your Seafile Server

  1. seahub_settings.pyFILE_SERVER_ROOT = ‘https://yourdomain.with.ssl/seafhttp’
  2. seafile.conf
    [fileserver]
    port = 8082[seahub]
    port = 8000
    fastcgi = false
  3. ccnet.confSERVICE_URL = https://yourdomain.with.ssl/

Settings for your IIS Server

  1. Install Application Request Routing Cache for your IIS Server via Web Platform Installer or by getting it on the web
  2. Create a website that will point to yourdomain.with.ssl on port 80 ONLY
  3. Open the web.config that will be created for that website and enter the following configuration<?xml version=”1.0″ encoding=”UTF-8″?>
    <configuration>
    <system.webServer>
    <rewrite>
    <rules>
    <rule name=”Redirect to HTTPS” enabled=”true” stopProcessing=”true”>
    <match url=”(.*)” />
    <action type=”Redirect” url=”https://{HTTP_HOST}/{R:1}” />
    </rule>
    </rules>
    </rewrite>
    </system.webServer>
    </configuration>
  4. Create another website that will point to yourdomain.with.ssl on port 443 ONLY
  5. Open the web.config that will be created for that website and enter the following configuration<?xml version=”1.0″ encoding=”UTF-8″?>
    <configuration>
    <location path=”” overrideMode=”Deny”>
    </location>
    <system.webServer>
    <security>
    <requestFiltering allowDoubleEscaping=”true” />
    </security>
    <rewrite>
    <rules>
    <clear />
    <rule name=”Redirect to HTTPS” enabled=”true” stopProcessing=”true”>
    <match url=”(.*)” />
    <conditions logicalGrouping=”MatchAll” trackAllCaptures=”false”>
    <add input=”{HTTPS}” pattern=”^OFF$” />
    </conditions>
    <action type=”Redirect” url=”https://{HTTP_HOST}/{R:1}” redirectType=”Permanent” />
    </rule>
    <rule name=”seafilehttp” stopProcessing=”true”>
    <match url=”seafhttp/(.*)” />
    <conditions logicalGrouping=”MatchAll” trackAllCaptures=”false” />
    <action type=”Rewrite” url=”http://127.0.0.1:8082/{R:1}” appendQueryString=”true” logRewrittenUrl=”true” />
    </rule>
    <rule name=”seafile” enabled=”true” stopProcessing=”true”>
    <match url=”(.*)” />
    <conditions logicalGrouping=”MatchAll” trackAllCaptures=”false” />
    <action type=”Rewrite” url=”http://localhost:8000/{R:1}” appendQueryString=”true” logRewrittenUrl=”true” />
    </rule>

    </rules>
    <outboundRules>
    <preConditions>
    <preCondition name=”ResponseIsHtml1″>
    <add input=”{RESPONSE_CONTENT_TYPE}” pattern=”^text/html” />
    </preCondition>
    </preConditions>
    </outboundRules>
    </rewrite>
    <httpErrors errorMode=”DetailedLocalOnly” />
    </system.webServer>
    </configuration>

  6. Next is the critical part that most tutorial missed to include as they don’t reflect the settings on Seafile Configuration.
  7. Now Login to your Seafile Admin Area webpage and navigate to Settings section
  8. On the SERVICE_URL enter https://yourdomain.with.ssl/
  9. On the FILE_SERVER_ROOT enter https://yourdomain.with.ssl/seafhttp
  10. Now you are done and navigation, download, and upload will now work properly.

God Bless!

Thanks,
Thomie

Remote Desktop Manager

Are you like me who is managing a number of Windows Server? And might be maintaining multiple credential for each. I know its hard and you have the capability of saving the password. But remembering those server name or url is not that easy and I think this tool is right for you.

Microsoft has a manager for that and is called Remote Desktop manager. What it do is enable you to save your servers either per item or you may group them and also state a general setting and credential or even specify one for each.

Go ahead and download it at here.

Disable Copy and Paste on RDP

Hi,

I have given a task to research on the web on how to disable RDP’s Copy and Paste of files due to some security issues. The following Steps should be done with Administrator rights.

  1. Open GPEdit.msc on Windows by Pressing Window Key + R
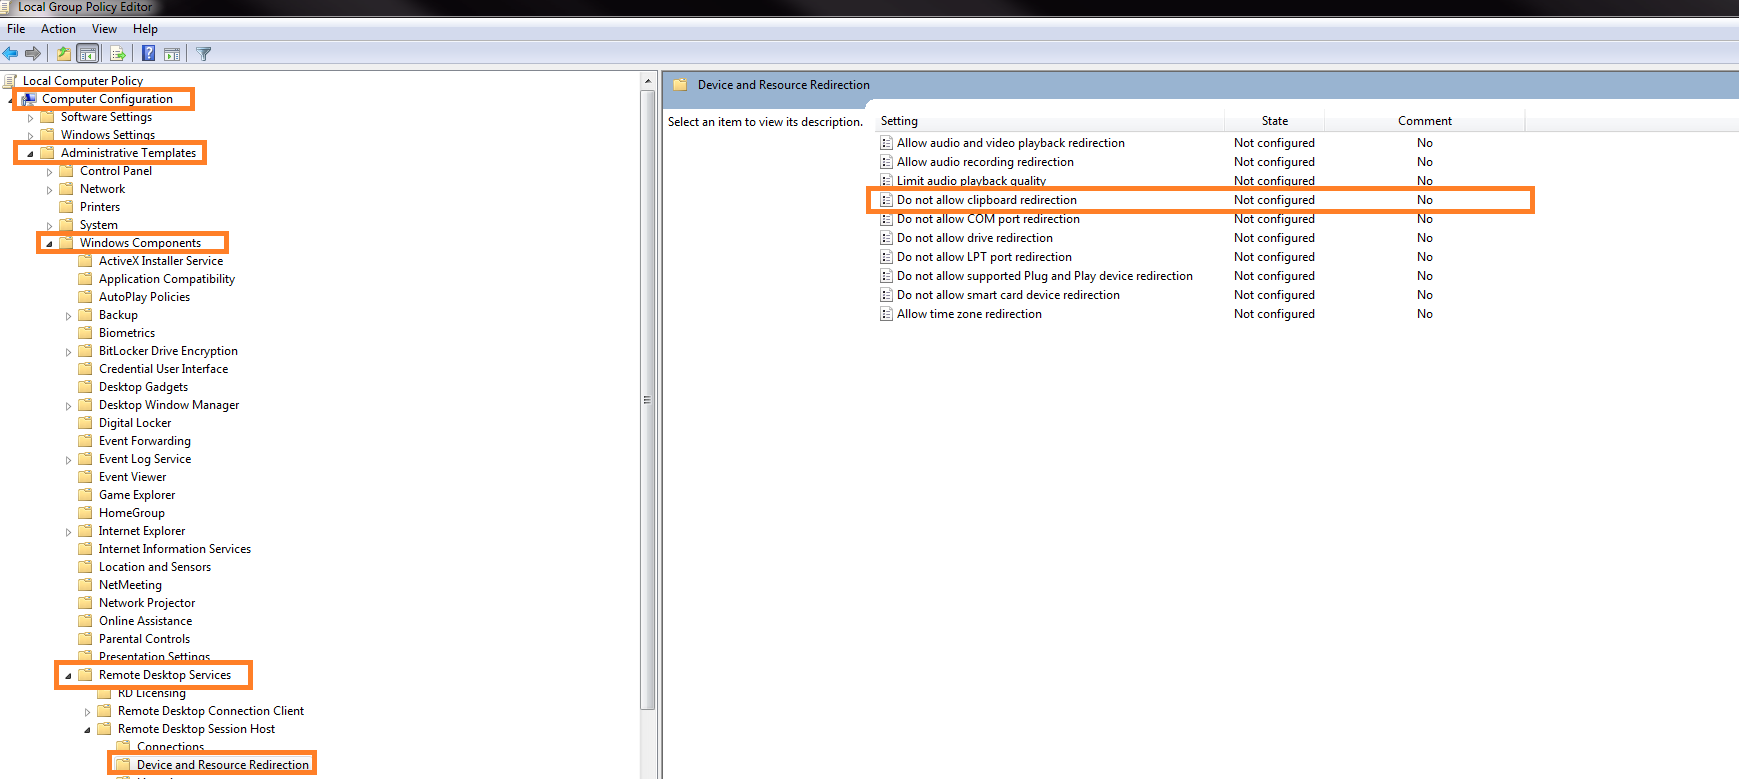
  2. A Window named Local Group Policy Editor will be shown.
  3. Navigate to Computer Configuration > Administrative Templates > Windows Components > Remote Desktop Services > Remote Desktop Session Host > Device and Resource Redirection
    step a
  4. On the Extended Tab double click Do not allow clipboard redirection
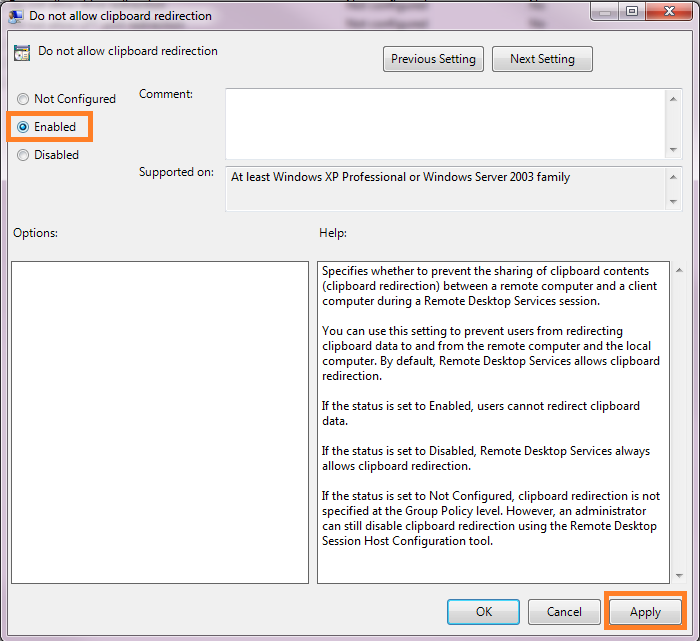
  5. A Window named Do not allow clipboard redirection will be shown.
  6. Click Enabled and Click Apply
    step b
  7. Make sure that all users will Log Off and then Login to implement this new settings.
  8. Done

Source
God Bless!

Thanks,
Thomie