Author Archives: Thomie Jose San Agustin

About Thomie Jose San Agustin

He is a Microsoft Certified Professional whom develop different website using ASP .NET MVC and PHP. He can also create systems out of C#. A Magna Cum Laude of Adamson University whom started a Freelance company named i-CT Combinatorics Technology with his friend Calbin Montalban. He accepts both Website and System development and even can help now his colleagues in generating their logic and research.

Replace words on MS Word using C#

Hi,

Recently I was instructed to create an application that will be able to replace an array of words and replace them with an array of corresponding words on an MS Word document. With this I’ve searched the following:

Prerequisites

  1. Visual Stduio
  2. Install the nuget package DocX
  3. Administrative access on the context the application is running

Code

Dictionary<string, string> lReplacements = new Dictionary<string, string>();
string newFullPath = @”c:\sample.docx”;

using (DocX document = DocX.Load(newFullPath))
{

//for loop is better than foreach
foreach (var item in lReplacements)
{

document.ReplaceText(item.Key, item.Value);

}
document.Save();

}

Hope it helped you as it helped me with this simple snippet.

God Bless!
Thanks,
Thomie

Convert Hard-drive from Dynamic to Basic

Hi,

Just recently we had a requirement to enable bitlocker on our development machines. Unfortunately you can’t use bitlocker on hard drive that of type DYNAMIC. So initially we were advised to have our machines reformatted. We all know that having our development machines reformatted will result to downtime on development task so I tried searching the web for solution and I found one.

As always for a peace of mind you may backup your files just in case you did something that is not part of the steps.


Summary

  1. Delete volume of the drive using Diskpart and convert drive to basic
  2. Use Gparted to recreate the volume
  3. Enable bitlocker

Details

  1. Create a Gparted bootable disk
    1. Download the latest YUMI Multiboot creator
    2. Download the latest GParted ISO either the x64 or the one that is compatible to your machine
    3. Insert the USB drive to your machine
    4. Run YUMI
    5. On Step 1 select the USB drive and check on Format drive preferably as FAT32
    6. On Step 2 select Gparted
    7. On Step 3 locate the downloaded ISO file from Step 1.2
    8. Click Create and wait for the USB drive to be created successfully
    9. Keep it for now as we will use it later
  2. Create a local administrator
    1. This is a different from a domain admin that is created for corporate machine this is an account that binded only to your machine
    2. To create open Computer Management
    3. Navigate to Local User admin Groups > Users
    4. Right click and select New User
    5. Fill up the following accordingly
      1. User name
      2. Full Name
      3. Password
      4. Confirm Password
      5. User must change password at next logon : UNCHECKED
    6. Double click on the newly created account and select the Member of Tab
    7. Click Add and search for Administrators
  3. Boot your machine to command prompt, on our Machine we are using Windows 10 and below are the steps to boot to the command prompt
    1. On your task bar go to All Settings
    2. Select Update & Security
    3. Select Recovery
    4. Under Advance startup click on Restart Now
    5. Your machine will restart
    6. On the said screen navigate to find the Command Prompt usually it is found by:
      1. Troubleshooting > Advanced > Command prompt
      2. Then select the local admin you have created on Step #2
    7. Type in Diskpart
    8. Type in  list disk take note of the disk you want to convert to basic
    9. Type in select disk <disknumber>
    10. Type in detail disk take note of the details for later reference #3.10
    11. This time we will delete all the volume of the said disk by
      1. select volume <volumenumber>
      2. delete volume
      3. Repeat step untill all volume has been deleted
    12. When all volumes has been deleted you may now convert that selected disk on #3.10 by typing convert basic
    13. Now our disk is converted to basic we need to reboot our machine and boot unto our USB live drive that we have created on Step #1
  4. After booting up on the USB Drive just look for the Gparted and just press enter until you see the desktop of Gparted
    1. Open GParted app and make sure that the drive we wanted to convert to basic is showing unallocated as we have deleted the volume on Step #3
    2. Now open terminal and type the following steps
      1. sudo -s
      2. testdisk
        1. On the testdisk follow this steps
          1. Select No Log.
          2. Select the disk drive you want to recover, e.g. /dev/sdc.
          3. Select your partition table type. Usually it’s Intel.
          4. Select Analyse and Quick Search.
          5. If you get asked whether your partition was created under Vista, answer yes/no.
          6. Your drive will be analysed and you will see a list of all found partitions. If you know what you are doing, you can edit the list, but usually that list is already the volume we’ve got on Step #3.10 and if yes just press Enter.
          7. On the next screen you have the option to either perform a second Deeper Search, or Write the current partition table to disk. If the quick search, which we checked if it matched our volume on Step #3.10, was successful, choose Write.
      3. Close and Open the GParted app to verify the changes
      4. If all is well you can now exit GParted and boot again
  5. Your machine will now boot properly and your drive will now be on Basic type.
  6. You can now enable bitlocker as needed.


Hope it helped you as it did to me.


God Bless!

Thanks,
Thomie


Referrences:

https://www.partition-tool.com/easeus-partition-manager/convert-dynamic-disk-to-basic-disk.htm

YUMI – Multiboot USB Creator

https://gparted.org/download.php

https://ubuverse.com/recover-a-disk-partition-with-testdisk-and-gparted-live/

FotoJet Create Collage Online!

I was requested to review this tool called FotoJet. And what can I say is “Its worth it”. Let me tell you why with this technical review.

Programming Language

The programming language used is Action Script i think because its running under the context of Adobe Flash Player. Even though they have mobile have which is very nice and we’ll review it on another session.

If you want to use fotojet web make sure you are accessing it on a desktop because it is design for a desktop environment. Even though there is a browser that is capabale of running Adobe Flash Player like Puffin it is not designed to work on a mobile environment which it is detecting via the said screenshot.

UI

The ui is like you are using a desktop application which give a native app feel. It has inbuilt ui guided step by step to creage your wonderful collage.

Input and Output

Its input just require your image to be browsed and all the design can be done via the web app itself. It has also inbuilt font but some of them need payment which is explainable due to copyright or agreements I think.

In any case after building with the app I am satisfied with how easy it is to create one. Here are the samples I created that I loved much.

Review: Skywave Zensei Ultra Dual Polarity Antenna

In a mist of an island which is a case of my wife’s family is a need for a remote way to access internet. Here in my mother-in-law residence internet connection is a difficulty. You get internet connection in a few minutes and none for few minutes also. There are cases that I meed internet connection and we had to go thru an exploration just to get a internet from a neighbor.

Today is diffrent. We constructed to have a modem along with a Skywave Zensei Ultra Dual Polarity Antenna and poof its worth it. Let me explain why.

Powerful Gain

With the 2×24 dbi gain it absolutely give you the boost that your modem needs. From a 1 to none bar of signal that you get of your modem you will really get 3-full bar of signal that can give yo the experience of internet just like if you are on the Urban area. I will assure you that with proper implementation you’ll get satisfied with it.
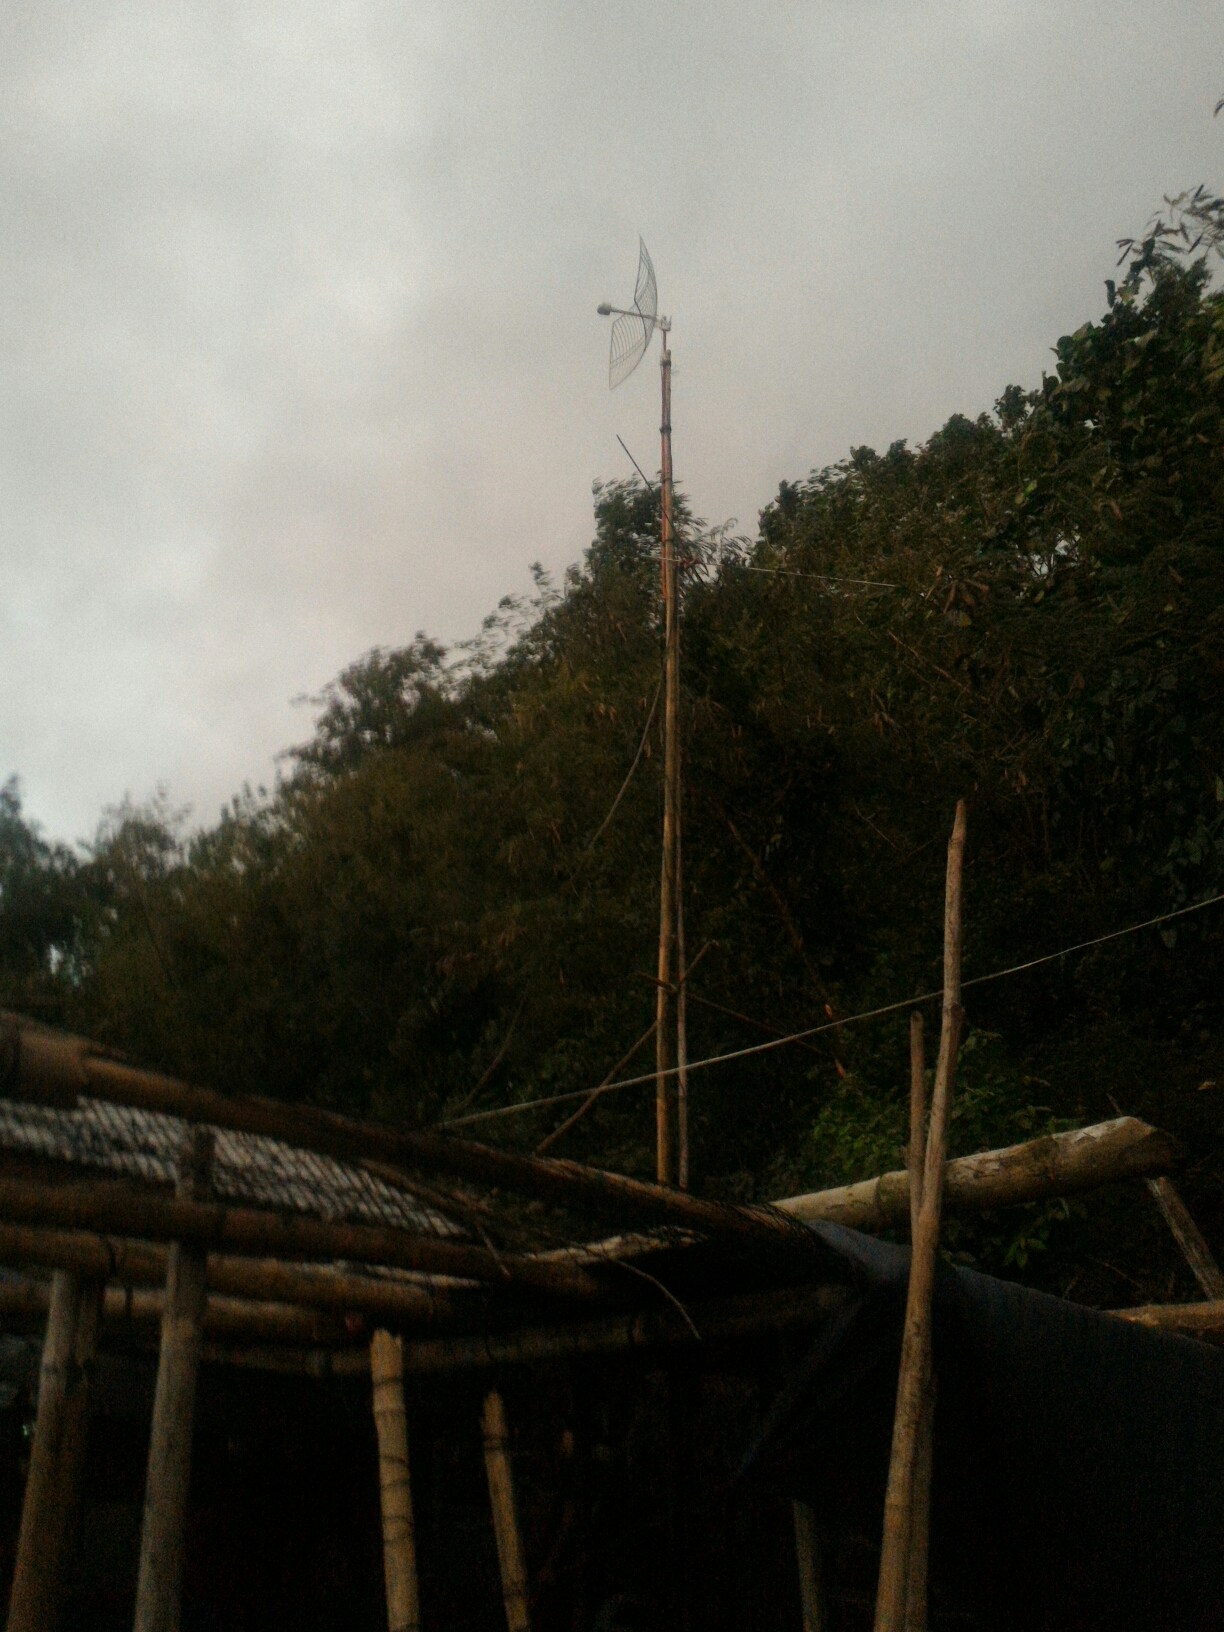
A thought material

Its build with a high grade aluminum that is power-coated that will surely stand most climate on your area. We had experienced it on thought wind and it never bend with the help of its dual clamping tools that I really loved.
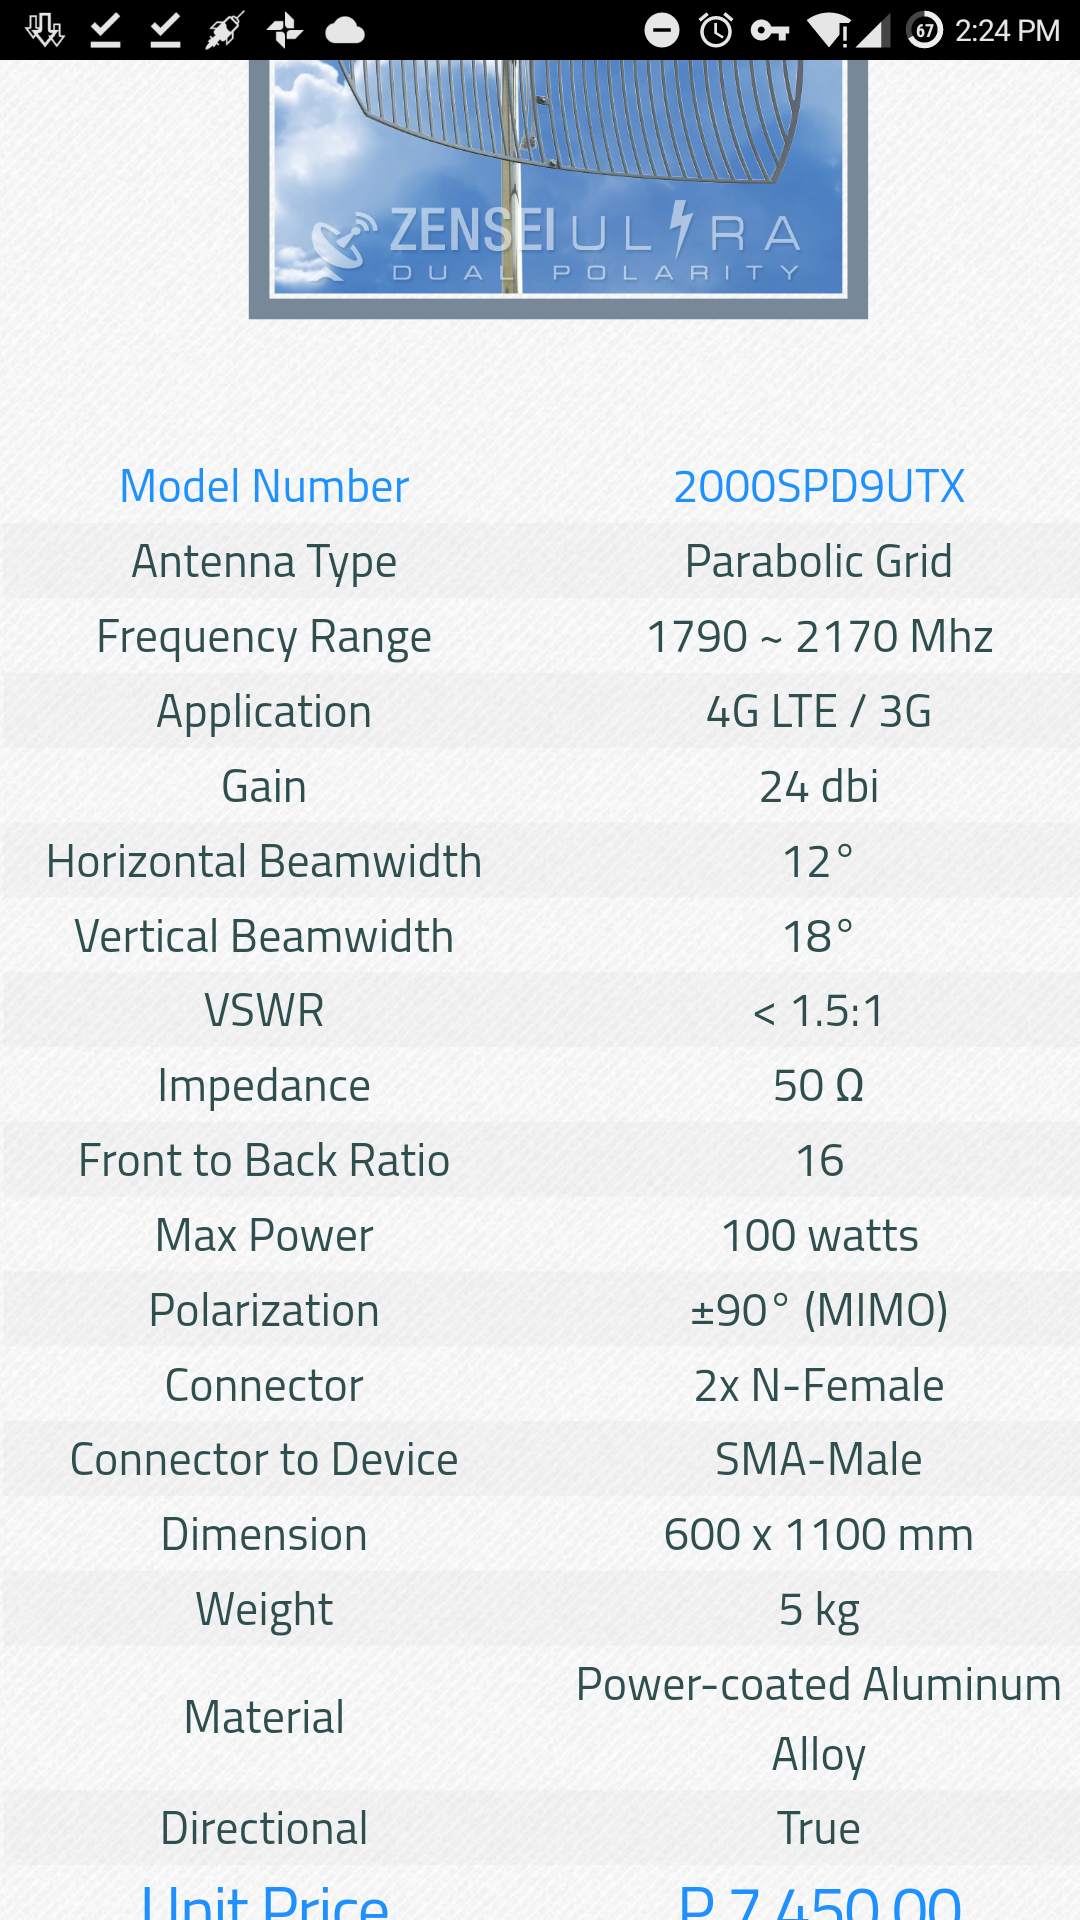
The frequency

Its frequency is a good coverage 1790~2170 Mhz will cover your 3G and 4G need. Just make sure that your area cover those frequency before proceeding with the purchase.

Conclusion

If you want get a boost and be satisfied I strongly suggest to buy one. Its not that cheap to buy one but investing to have a wonderful internet experience, specially to your love ones, will make it a worth. It cost P7450.00 c/o uplift.ph which has Cash on Deliver and comes with a 10m cable or upgrade it with a fee.

God Bless and Happy New Year!

C# Task<object> return Type

In every signalr or webapi request based application there is a need to indicate the return type of Task<object> along with the async keyword. Let say this sample:

public async Task<MyObject> GetItem(){

MyObject myObject = new MyObject();

myObject = await getSomeWhereThere();

#doSomethingElse

return myObject;

}

In this sample, we all know that this is a asynchronous request from somewhere. Which dictates that myObject will return later after the getSomeWhereThere(); has finished executing. But we need to remind of a very important thing that #doSomethingElse will not be executed in Xamarin if it is not properly used. Let say we did this instead:

public async void GetItem(){

MyObject myObject = new MyObject();

myObject = await getSomeWhereThere();

#doSomethingElse

}

In this code the #doSomethingElse will not be executed because it will only assume that after the getSomeWhereThere(); is executed you don’t mind if #doSomethingElse is still needed. Thus make sure that we use the Task<MyObject> in cases like this so that #doSomethingElse will still be executed.

PayMaya a good way to pay online

Hi,

Since then my only way to buy online is using my EON from UnionBank. But the ways to have it loaded is not many and is limited to Western union transfer or in back deposit which will take time of course. Thank fully there is another one and that is PayMaya. PayMaya a good way to pay online because it’s easy to load up with its several partners. Namely, BDO Online transfer, 7-Eleven, and MiniStop which is very accessible.

I strongly recommend it to my love ones and friends because of its flexibility. So head up to their website, https://paymaya.com/, to get more information and get yours now!


God Bless!

Tip: MSSQL Drop all triggers

Its funny that sometimes we need to drop all triggers because we inputed a logic that will prohibit a particular code. In cases like this we can drop them all and later create them again. In database with plent of tables, 100 tables, its hard if we drop them one by one. So here is a script that can help you as it just did to me.

SELECT N’DROP TRIGGER ‘ +QUOTENAME(OBJECT_SCHEMA_NAME(t.object_id)) + N’.’ +   QUOTENAME(t.name) + N’; ‘ + NCHAR(13)

FROM sys.triggers AS t

WHERE t.is_ms_shipped = 0 AND t.parent_class_desc = N’OBJECT_OR_COLUMN’;


God Bless!

Tip: MSSQL list all SPs by its modified date

In some cases we may want to get from MSSQL list all SPs by its modified date so that we know what we or our college did modified last. Here is a query you may use

SELECT name, OBJECT_DEFINITION(object_id), modify_date
FROM sys.procedures
ORDER BY modify_date DESC

This query will return the SPs from the latest modified stored procedure. Its handy specially when your migrating SPs manually.

God Bless!

Repartition Hard Disk with Bad Sector

Do you have a hard disk that have a bad sector? Do you want to still use it but move the bad sectors to a partition in such a way you can still use the disk? Then

Repartition Bad Drive will repartion your drive in such a way it make all bad sector with some margins to be still on RAW format. That way you can still use the drive in multiple bit of drive, specially if it has a big capacity such as 1TB, and store some data that you which to store without purchasing anything.

Download it now from dposoft and the good of it, Its FREE!

Screenshots


Source: http://www.dposoft.net/rbd.html

Tip: View your website from different countries

Hi,

May be your a developer that wanted to view your website from different countries. Yes in instance of DNS migration or just for the purpose of other troubleshooting needs. Then go visit LocaBrowser which enable you to visit your website in a max of 6 destination. Go there now http://www.locabrowser.com/


screenshot-324

God Bless!

Thanks,
Thomie

Tips : Install .Net 3.5 of Windows Feature when under Proxy

Hi There,

We recently had a problem with our Windows 10 to Install .Net 3.5 of Windows Feature when under Proxy. We found out that the installer of Windows has the said installer with it but needs to be triggered by the following steps:

1. Run CMD as Administrator
2. DISM /Image:C:\test\offline /Enable-Feature /FeatureName:NetFx3 /All /LimitAccess /Source:D:\sources\sxs

God Bless!

Thanks,
Thomie

MSSQL: Search all Records of a Database

Hi,

There are times that we need to find something or search all records particular on an unfamiliar database in MSSQL. It is good to know how to query every item as a worst case scenario. I found this online which can help you, just like me, on looking unto a database that has no documentation.

DECLARE
@search_string VARCHAR(100),
@table_name SYSNAME,
@table_schema SYSNAME,
@column_name SYSNAME,
@sql_string VARCHAR(2000)

SET @search_string = ‘Test’

DECLARE tables_cur CURSOR FOR SELECT TABLE_SCHEMA, TABLE_NAME FROM INFORMATION_SCHEMA.TABLES WHERE TABLE_TYPE = ‘BASE TABLE’

OPEN tables_cur

FETCH NEXT FROM tables_cur INTO @table_schema, @table_name

WHILE (@@FETCH_STATUS = 0)
BEGIN
DECLARE columns_cur CURSOR FOR SELECT COLUMN_NAME FROM INFORMATION_SCHEMA.COLUMNS WHERE TABLE_SCHEMA = @table_schema AND TABLE_NAME = @table_name AND COLLATION_NAME IS NOT NULL — Only strings have this and they always have it

OPEN columns_cur

FETCH NEXT FROM columns_cur INTO @column_name
WHILE (@@FETCH_STATUS = 0)
BEGIN
SET @sql_string = ‘IF EXISTS (SELECT * FROM ‘ + QUOTENAME(@table_schema) + ‘.’ + QUOTENAME(@table_name) + ‘ WHERE ‘ + QUOTENAME(@column_name) + ‘ LIKE ”%’ + @search_string + ‘%”) PRINT ”’ + QUOTENAME(@table_schema) + ‘.’ + QUOTENAME(@table_name) + ‘, ‘ + QUOTENAME(@column_name) + ””

EXECUTE(@sql_string)

FETCH NEXT FROM columns_cur INTO @column_name
END

CLOSE columns_cur

DEALLOCATE columns_cur

FETCH NEXT FROM tables_cur INTO @table_schema, @table_name
END

CLOSE tables_cur

DEALLOCATE tables_cur

God Bless!

Thanks,
Thomie

Reapply jQuery validate to a Form loaded via AJAX

Here is a quick snippet to apply jQuery validate to a form loaded via AJAX.


var form = $(“#youFormIdentifier”);
form.removeData(‘validator’);
form.removeData(‘unobtrusiveValidation’);
$.validator.unobtrusive.parse(form);


Then you can now check if it is valid via:


var isValid = form.valid();

Convert.ToDateTime Regardless of Culture

Did you upgrade to Windows 10 recently and your MVC website now have an issue under the development phase after it? Then maybe you also experience the same issue that affected your code on IIS. That is becuase Convert.ToDateTime utilizes the machine’s Culture(It changes when you use Windows 10 even you are using the same Country set) to parse a Date time. So to use it regardless of the Culture use the code snippet below.


string s = “20.09.2015 10.16.12”;
string expextedFormat = “dd.MM.yyyy HH.mm.ss”;
DateTime d;
bool isValid = DateTime.TryParseExact(s, expextedFormat , CultureInfo.InvariantCulture, DateTimeStyles.None, out d);


Hope it helped you as it helped me.

ELMAH – Error Logging Modules and Handlers

What is ELMAH?

  • ELMAH (Error Logging Modules and Handlers) is an application-wide error logging facility that is completely pluggable. It can be dynamically added to a running ASP.NET web application, or even all ASP.NET web applications on a machine, without any need for re-compilation or re-deployment.
  • Once ELMAH has been dropped into a running web application and configured appropriately, you get the following facilities without changing a single line of your code:
    • Logging of nearly all unhandled exceptions.
    • A web page to remotely view the entire log of recoded exceptions.
    • A web page to remotely view the full details of any one logged exception, including colored stack traces.
    • In many cases, you can review the original yellow screen of death that ASP.NET generated for a given exception, even with customErrors mode turned off.
    • An e-mail notification of each error at the time it occurs.
    • An RSS feed of the last 15 errors from the log.

How to Install ELMAH on your MVC Project?

  • Open Nuget Package Manager on the MVC Project
  • Search for ELMAH and Install it.
  • Then configure it.

ELMAH Configuration

  • It will already add some configuration under your web.config but we need to include some configuration so that it will point to a database.
  • <connectionStrings>

  <add name=”elmahConnectionString” connectionString=”Data Source=Server;Initial Catalog=ELMAH_DEV;uid=user;pwd=user;Pooling=true;Min Pool Size=0;Max Pool Size=999;” providerName=”System.Data.SqlClient” />

</connectionStrings>

  • <elmah>

    <!–

See http://code.google.com/p/elmah/wiki/SecuringErrorLogPages for

more information on remote access and securing ELMAH.

–>

<security allowRemoteAccess=”true” />

<errorLog type=”Elmah.SqlErrorLog, Elmah” applicationName=”NameOfApplication_DEV” connectionStringName=”elmahConnectionString” />

</elmah>

  • We also need to remove some sections that we don’t need specially the section below that automatically create a page for the logs.
  • <location path=”elmah.axd” inheritInChildApplications=”false”>…</location>

Logging

  • All uncatched exception will automatically be recorded.
  • All exception handling will NOT be recorded automatically. It needs to be manually logged by including the Elmah.ErrorSignal.FromCurrentContext().Raise(ex);

try{
throw new Exception(“Some Exception”);
}catch(Exception ex){

Elmah.ErrorSignal.FromCurrentContext().Raise(ex);
}


Installing Cordova when under a Proxy

I have been installing cordova on my work machine this passed days and I am really not happy when it failed because it can’t connect to the internet because our proxy is using AD Authentication. I have tried some NTLM proxy but its not working anymore. My alternative was to connect to the internet directly which is something that will work only when I am at home. Thank fully I found a working way to make it happen with a help from github gist.

Here is the modified steps:

  1. Install CNTLM(mirror) in a folder where you have full rights to run it as administrator.
  2. Open cntlm.ini and fill it :Username YOUR_USERNAME
    Domain YOUR_DOMAIN
    Proxy YOUR_PROXY_IP:PORT
    Password YOUR_PASSWORD
    Listen 53128
  3.  Run the CNTLM by running this command on the context of the folder on Step #1
    cntlm -v -f -c "cntlm.ini"
  4. Run the following on your NPM commands on your Node.js window
    npm config set proxy http://localhost:53128
    npm config set https-proxy http://localhost:53128
    npm config set registry http://registry.npmjs.org
  5. Now you can install Cordova without any issue and even install other NPM modules.

Just a CAUTION your password is in plain text. So be reminded to remove it when your working on a multi-developer machine.

God Bless!

Service Oriented Architecture

Service Oriented Architecture is an architecture that make all request bounded on a form of a Service such as APIs. It consist of three different layers as follows:

  • Authorization Server – Responsible on Authorizing and Authenticating Users and encapsulate it on a token.
  • Resource Server – Responsible to give data based on the token that will be given by the Authorization server.
  • Clients – Responsible to request the token on behalf of a user from the Authorization Server and request resources from the Resource Server.

With this kind of architecture developer can make their application compatible to different platform such as Windows, Linux, and Mac OS. Some implementation of this uses some protocols such as OAuth which is implemented in different ways.

Seafile SSL/HTTPS on IIS

Seafile SSL/HTTPS on IIS was a very interesting journey when I was trying to implement such change as it gave me some interesting facts that I have notice not well documented. In this article we will assume that you have already installed a running instance of your Seafile on your Windows Server but was server via HTTP only. So lets get started:

Additional Assumption

  • Seafile is running on its default ports 8000 and 8082
  • You already know how to get a SSL Certificate and Apply it on your SSL

Settings for your Seafile Server

  1. seahub_settings.pyFILE_SERVER_ROOT = ‘https://yourdomain.with.ssl/seafhttp’
  2. seafile.conf
    [fileserver]
    port = 8082[seahub]
    port = 8000
    fastcgi = false
  3. ccnet.confSERVICE_URL = https://yourdomain.with.ssl/

Settings for your IIS Server

  1. Install Application Request Routing Cache for your IIS Server via Web Platform Installer or by getting it on the web
  2. Create a website that will point to yourdomain.with.ssl on port 80 ONLY
  3. Open the web.config that will be created for that website and enter the following configuration<?xml version=”1.0″ encoding=”UTF-8″?>
    <configuration>
    <system.webServer>
    <rewrite>
    <rules>
    <rule name=”Redirect to HTTPS” enabled=”true” stopProcessing=”true”>
    <match url=”(.*)” />
    <action type=”Redirect” url=”https://{HTTP_HOST}/{R:1}” />
    </rule>
    </rules>
    </rewrite>
    </system.webServer>
    </configuration>
  4. Create another website that will point to yourdomain.with.ssl on port 443 ONLY
  5. Open the web.config that will be created for that website and enter the following configuration<?xml version=”1.0″ encoding=”UTF-8″?>
    <configuration>
    <location path=”” overrideMode=”Deny”>
    </location>
    <system.webServer>
    <security>
    <requestFiltering allowDoubleEscaping=”true” />
    </security>
    <rewrite>
    <rules>
    <clear />
    <rule name=”Redirect to HTTPS” enabled=”true” stopProcessing=”true”>
    <match url=”(.*)” />
    <conditions logicalGrouping=”MatchAll” trackAllCaptures=”false”>
    <add input=”{HTTPS}” pattern=”^OFF$” />
    </conditions>
    <action type=”Redirect” url=”https://{HTTP_HOST}/{R:1}” redirectType=”Permanent” />
    </rule>
    <rule name=”seafilehttp” stopProcessing=”true”>
    <match url=”seafhttp/(.*)” />
    <conditions logicalGrouping=”MatchAll” trackAllCaptures=”false” />
    <action type=”Rewrite” url=”http://127.0.0.1:8082/{R:1}” appendQueryString=”true” logRewrittenUrl=”true” />
    </rule>
    <rule name=”seafile” enabled=”true” stopProcessing=”true”>
    <match url=”(.*)” />
    <conditions logicalGrouping=”MatchAll” trackAllCaptures=”false” />
    <action type=”Rewrite” url=”http://localhost:8000/{R:1}” appendQueryString=”true” logRewrittenUrl=”true” />
    </rule>

    </rules>
    <outboundRules>
    <preConditions>
    <preCondition name=”ResponseIsHtml1″>
    <add input=”{RESPONSE_CONTENT_TYPE}” pattern=”^text/html” />
    </preCondition>
    </preConditions>
    </outboundRules>
    </rewrite>
    <httpErrors errorMode=”DetailedLocalOnly” />
    </system.webServer>
    </configuration>

  6. Next is the critical part that most tutorial missed to include as they don’t reflect the settings on Seafile Configuration.
  7. Now Login to your Seafile Admin Area webpage and navigate to Settings section
  8. On the SERVICE_URL enter https://yourdomain.with.ssl/
  9. On the FILE_SERVER_ROOT enter https://yourdomain.with.ssl/seafhttp
  10. Now you are done and navigation, download, and upload will now work properly.

God Bless!

Thanks,
Thomie

Remote Desktop Manager

Are you like me who is managing a number of Windows Server? And might be maintaining multiple credential for each. I know its hard and you have the capability of saving the password. But remembering those server name or url is not that easy and I think this tool is right for you.

Microsoft has a manager for that and is called Remote Desktop manager. What it do is enable you to save your servers either per item or you may group them and also state a general setting and credential or even specify one for each.

Go ahead and download it at here.

GIT vs TFS vs SVN

Just like you I have wonder what are the difference between the three Source Code top kind Repositories that are available online. So I have decided to create this article to enlighten myself and others who are looking into the distinguishing difference of each so let get started.

GIT
Git is recently very popular with, you guess it right, github.com as it is offering an online free public source code repositories that everyone can use absolutely free. One of the best highlight of this kind of repository is that “Your CLONED repository is actually the repository that can cloned by others with the history along it”. Thats why when you are getting the source code you get it using the command GIT CLONE with the clone on the command.

TFS
We all know that its a Mirsoft product so most user of TFS are Micorosft entusiasth with Licenses at hand. One of the primary reason of choosing this repo server is that it is thighlt integrated with Microsoft product on Visual Studio and some Office Apps. It is also good to point that it is best to use if you are looking into a source control that is not easily unbinable from its source control. Unbindable that you may not easily remove the binding of the Source code from TFS, well at least that is from my experience.

SVN
Previously popular with most users as it used on Google’s Code website and has plenty of server choices that you can freely download and deploy on your on server absolutely free. It has the build in ability to Easily unbind your source code (EXPORT). Though the only downside is that the only source of truth is on the server unlike GIT which you may trigger your CLONED repo as a source of truth and might be a primary reason that some user move from SVN to GIT.

Well this are all based from my experience and some reading. But still don’t limit ourself on this items as there are also some reasons that is not indicated on this article that might be the triggering point of developers on choosing this kind of repository.

God Bless!

Thanks,
Thomie