Category Archives: Programming

ELMAH – Error Logging Modules and Handlers

What is ELMAH?

  • ELMAH (Error Logging Modules and Handlers) is an application-wide error logging facility that is completely pluggable. It can be dynamically added to a running ASP.NET web application, or even all ASP.NET web applications on a machine, without any need for re-compilation or re-deployment.
  • Once ELMAH has been dropped into a running web application and configured appropriately, you get the following facilities without changing a single line of your code:
    • Logging of nearly all unhandled exceptions.
    • A web page to remotely view the entire log of recoded exceptions.
    • A web page to remotely view the full details of any one logged exception, including colored stack traces.
    • In many cases, you can review the original yellow screen of death that ASP.NET generated for a given exception, even with customErrors mode turned off.
    • An e-mail notification of each error at the time it occurs.
    • An RSS feed of the last 15 errors from the log.

How to Install ELMAH on your MVC Project?

  • Open Nuget Package Manager on the MVC Project
  • Search for ELMAH and Install it.
  • Then configure it.

ELMAH Configuration

  • It will already add some configuration under your web.config but we need to include some configuration so that it will point to a database.
  • <connectionStrings>

  <add name=”elmahConnectionString” connectionString=”Data Source=Server;Initial Catalog=ELMAH_DEV;uid=user;pwd=user;Pooling=true;Min Pool Size=0;Max Pool Size=999;” providerName=”System.Data.SqlClient” />

</connectionStrings>

  • <elmah>

    <!–

See http://code.google.com/p/elmah/wiki/SecuringErrorLogPages for

more information on remote access and securing ELMAH.

–>

<security allowRemoteAccess=”true” />

<errorLog type=”Elmah.SqlErrorLog, Elmah” applicationName=”NameOfApplication_DEV” connectionStringName=”elmahConnectionString” />

</elmah>

  • We also need to remove some sections that we don’t need specially the section below that automatically create a page for the logs.
  • <location path=”elmah.axd” inheritInChildApplications=”false”>…</location>

Logging

  • All uncatched exception will automatically be recorded.
  • All exception handling will NOT be recorded automatically. It needs to be manually logged by including the Elmah.ErrorSignal.FromCurrentContext().Raise(ex);

try{
throw new Exception(“Some Exception”);
}catch(Exception ex){

Elmah.ErrorSignal.FromCurrentContext().Raise(ex);
}
 

Installing Cordova when under a Proxy

I have been installing cordova on my work machine this passed days and I am really not happy when it failed because it can’t connect to the internet because our proxy is using AD Authentication. I have tried some NTLM proxy but its not working anymore. My alternative was to connect to the internet directly which is something that will work only when I am at home. Thank fully I found a working way to make it happen with a help from github gist.

Here is the modified steps:

  1. Install CNTLM(mirror) in a folder where you have full rights to run it as administrator.
  2. Open cntlm.ini and fill it :Username YOUR_USERNAME
    Domain YOUR_DOMAIN
    Proxy YOUR_PROXY_IP:PORT
    Password YOUR_PASSWORD
    Listen 53128
  3.  Run the CNTLM by running this command on the context of the folder on Step #1
    cntlm -v -f -c "cntlm.ini"
  4. Run the following on your NPM commands on your Node.js window
    npm config set proxy http://localhost:53128
    npm config set https-proxy http://localhost:53128
    npm config set registry http://registry.npmjs.org
  5. Now you can install Cordova without any issue and even install other NPM modules.

Just a CAUTION your password is in plain text. So be reminded to remove it when your working on a multi-developer machine.

God Bless!

Service Oriented Architecture

Service Oriented Architecture is an architecture that make all request bounded on a form of a Service such as APIs. It consist of three different layers as follows:

  • Authorization Server – Responsible on Authorizing and Authenticating Users and encapsulate it on a token.
  • Resource Server – Responsible to give data based on the token that will be given by the Authorization server.
  • Clients – Responsible to request the token on behalf of a user from the Authorization Server and request resources from the Resource Server.

With this kind of architecture developer can make their application compatible to different platform such as Windows, Linux, and Mac OS. Some implementation of this uses some protocols such as OAuth which is implemented in different ways.

Seafile SSL/HTTPS on IIS

Seafile SSL/HTTPS on IIS was a very interesting journey when I was trying to implement such change as it gave me some interesting facts that I have notice not well documented. In this article we will assume that you have already installed a running instance of your Seafile on your Windows Server but was server via HTTP only. So lets get started:

Additional Assumption

  • Seafile is running on its default ports 8000 and 8082
  • You already know how to get a SSL Certificate and Apply it on your SSL

Settings for your Seafile Server

  1. seahub_settings.pyFILE_SERVER_ROOT = ‘https://yourdomain.with.ssl/seafhttp’
  2. seafile.conf
    [fileserver]
    port = 8082[seahub]
    port = 8000
    fastcgi = false
  3. ccnet.confSERVICE_URL = https://yourdomain.with.ssl/

Settings for your IIS Server

  1. Install Application Request Routing Cache for your IIS Server via Web Platform Installer or by getting it on the web
  2. Create a website that will point to yourdomain.with.ssl on port 80 ONLY
  3. Open the web.config that will be created for that website and enter the following configuration<?xml version=”1.0″ encoding=”UTF-8″?>
    <configuration>
    <system.webServer>
    <rewrite>
    <rules>
    <rule name=”Redirect to HTTPS” enabled=”true” stopProcessing=”true”>
    <match url=”(.*)” />
    <action type=”Redirect” url=”https://{HTTP_HOST}/{R:1}” />
    </rule>
    </rules>
    </rewrite>
    </system.webServer>
    </configuration>
  4. Create another website that will point to yourdomain.with.ssl on port 443 ONLY
  5. Open the web.config that will be created for that website and enter the following configuration<?xml version=”1.0″ encoding=”UTF-8″?>
    <configuration>
    <location path=”” overrideMode=”Deny”>
    </location>
    <system.webServer>
    <security>
    <requestFiltering allowDoubleEscaping=”true” />
    </security>
    <rewrite>
    <rules>
    <clear />
    <rule name=”Redirect to HTTPS” enabled=”true” stopProcessing=”true”>
    <match url=”(.*)” />
    <conditions logicalGrouping=”MatchAll” trackAllCaptures=”false”>
    <add input=”{HTTPS}” pattern=”^OFF$” />
    </conditions>
    <action type=”Redirect” url=”https://{HTTP_HOST}/{R:1}” redirectType=”Permanent” />
    </rule>
    <rule name=”seafilehttp” stopProcessing=”true”>
    <match url=”seafhttp/(.*)” />
    <conditions logicalGrouping=”MatchAll” trackAllCaptures=”false” />
    <action type=”Rewrite” url=”http://127.0.0.1:8082/{R:1}” appendQueryString=”true” logRewrittenUrl=”true” />
    </rule>
    <rule name=”seafile” enabled=”true” stopProcessing=”true”>
    <match url=”(.*)” />
    <conditions logicalGrouping=”MatchAll” trackAllCaptures=”false” />
    <action type=”Rewrite” url=”http://localhost:8000/{R:1}” appendQueryString=”true” logRewrittenUrl=”true” />
    </rule>

    </rules>
    <outboundRules>
    <preConditions>
    <preCondition name=”ResponseIsHtml1″>
    <add input=”{RESPONSE_CONTENT_TYPE}” pattern=”^text/html” />
    </preCondition>
    </preConditions>
    </outboundRules>
    </rewrite>
    <httpErrors errorMode=”DetailedLocalOnly” />
    </system.webServer>
    </configuration>

  6. Next is the critical part that most tutorial missed to include as they don’t reflect the settings on Seafile Configuration.
  7. Now Login to your Seafile Admin Area webpage and navigate to Settings section
  8. On the SERVICE_URL enter https://yourdomain.with.ssl/
  9. On the FILE_SERVER_ROOT enter https://yourdomain.with.ssl/seafhttp
  10. Now you are done and navigation, download, and upload will now work properly.

God Bless!

Thanks,
Thomie

GIT vs TFS vs SVN

Just like you I have wonder what are the difference between the three Source Code top kind Repositories that are available online. So I have decided to create this article to enlighten myself and others who are looking into the distinguishing difference of each so let get started.

GIT
Git is recently very popular with, you guess it right, github.com as it is offering an online free public source code repositories that everyone can use absolutely free. One of the best highlight of this kind of repository is that “Your CLONED repository is actually the repository that can cloned by others with the history along it”. Thats why when you are getting the source code you get it using the command GIT CLONE with the clone on the command.

TFS
We all know that its a Mirsoft product so most user of TFS are Micorosft entusiasth with Licenses at hand. One of the primary reason of choosing this repo server is that it is thighlt integrated with Microsoft product on Visual Studio and some Office Apps. It is also good to point that it is best to use if you are looking into a source control that is not easily unbinable from its source control. Unbindable that you may not easily remove the binding of the Source code from TFS, well at least that is from my experience.

SVN
Previously popular with most users as it used on Google’s Code website and has plenty of server choices that you can freely download and deploy on your on server absolutely free. It has the build in ability to Easily unbind your source code (EXPORT). Though the only downside is that the only source of truth is on the server unlike GIT which you may trigger your CLONED repo as a source of truth and might be a primary reason that some user move from SVN to GIT.

Well this are all based from my experience and some reading. But still don’t limit ourself on this items as there are also some reasons that is not indicated on this article that might be the triggering point of developers on choosing this kind of repository.

God Bless!

Thanks,
Thomie

PhoneGap Installation Guide – Windows

Hi,

Since we need to have a guide for our teammate I have decided that instead of teaching how to install one by one to my colleagues I will create an online user guide so that any other person online that will be also looking for guide will also have the help that they need. So lets get started.

Prerequisites


Installation Guide

  1. Install JDK, just proceed with standard installation process.
  2. Install Android Studio, just proceed with standard installation process. Please note that during the installation phase it will also download the Android SDK with is more than 3GB. PLEASE NOTE OF THE SDK INSTALLATION FOLDER AS THIS WILL BE USED ON LATER PROCEDURE.
  3. Install Aptana, just proceed with standard installation process. Please also note that during installation phase it will also download some prerequisite application including Node.js& Git
  4. Go to START and look for Command Prompt and run it as Administrator.
  5. Type the command below and press enter and wait for the installation process to finish. It will take a while depending on your internet connection.
    npm install -g cordova
    npm install -g proto-list
    npm install -g os-tmpdir
    npm install -g os-homedir
    npm install -g are-we-there-yet
    npm install -g gauge
    npm install -g ansi
    npm install -g is-absolute
    npm install -g asap
    npm install -g minimatch
    npm install -g path-is-absolute
    npm install -g validate-npm-package-license
    npm install -g is-builtin-module
    npm install -g concat-stream
    npm install -g json-parse-helpfulerror
    npm install -g block-stream
    npm install -g fstream-ignore
    npm install -g readdir-scoped-modules
    npm install -g debuglog
    npm install -g lodash._baseflatten
    npm install -g lodash._baseuniq
    npm install -g lodash.restparam
    npm install -g unique-slug
    npm install -g phonegap
  6. After the installation close all window.
  7. Restart your Machine.
  8. Go to your SDK folder that is indicated during the installation of the Android Studio.
  9. Run SDK Manager and install most of the needed SDK, you may install all the SDK if you want to be sure. It will take a while to install depending on your internet connection.
  10. Run AVD Manager and create a virtual device.
  11. You may now proceed with the creation of your PhoneGap app.


You may also want to take note the following update on the Environment Variable if it is needed on your side.

ANT_HOME=C:\path\to\ant\folder\apache-ant-1.9.4
ANDROID_HOME=C:\path\to\the\folder\of\Android\sdk
JAVA_HOME = C:\Program Files (x86)\Java\jdk1.7.0_79

PATH
Append;%ANDROID_HOME%\tools;%ANDROID_HOME%\platform-tools;%JAVA_HOME%\bin;%ANT_HOME%\bin

Disable Copy and Paste on RDP

Hi,

I have given a task to research on the web on how to disable RDP’s Copy and Paste of files due to some security issues. The following Steps should be done with Administrator rights.

  1. Open GPEdit.msc on Windows by Pressing Window Key + R
  2. A Window named Local Group Policy Editor will be shown.
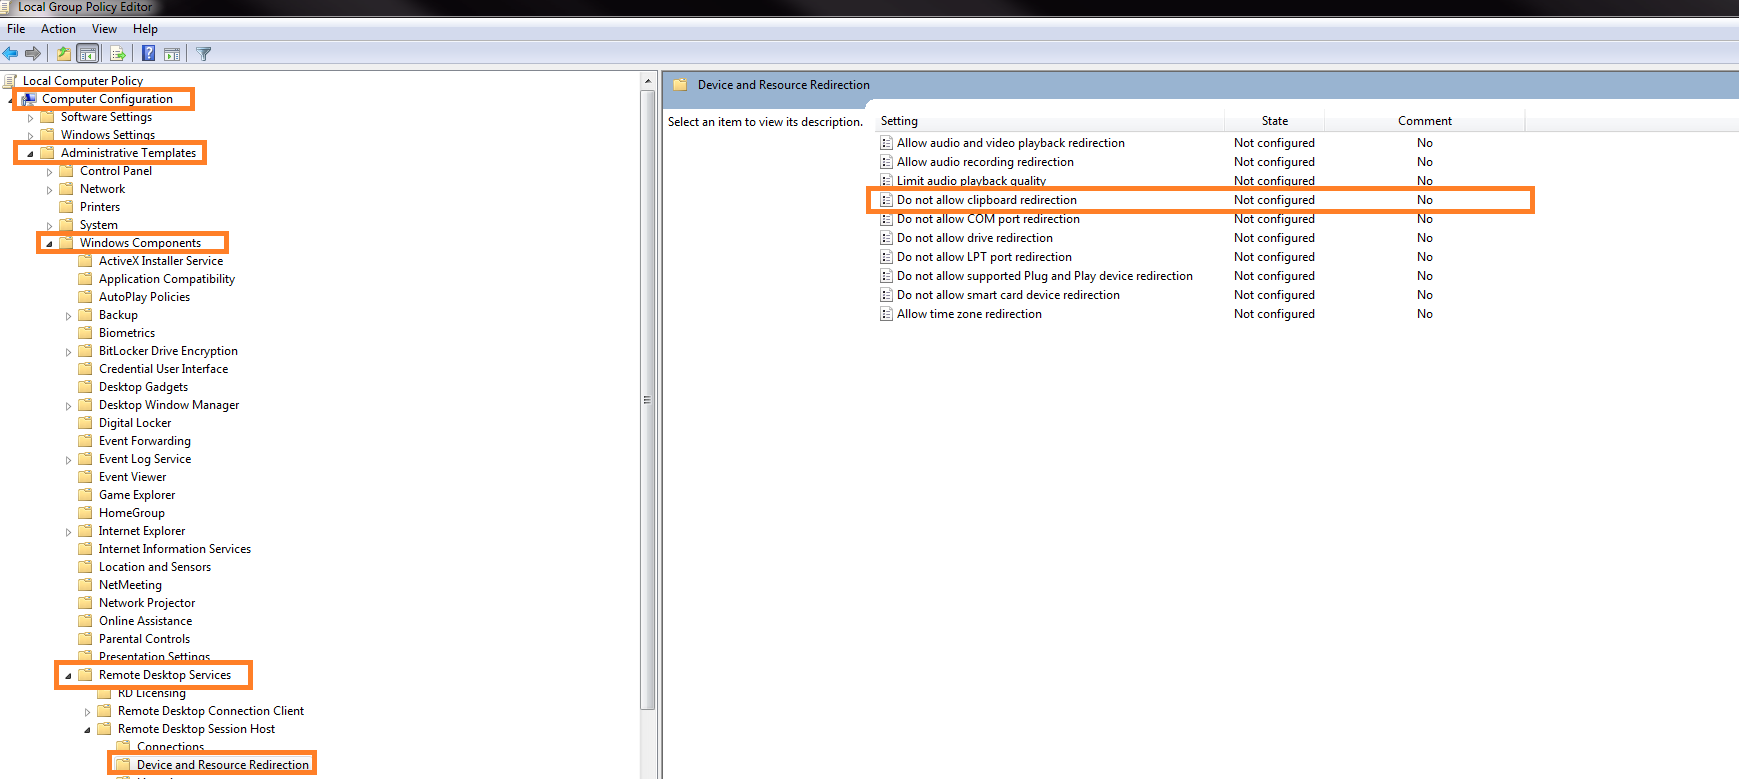
  3. Navigate to Computer Configuration > Administrative Templates > Windows Components > Remote Desktop Services > Remote Desktop Session Host > Device and Resource Redirection
    step a
  4. On the Extended Tab double click Do not allow clipboard redirection
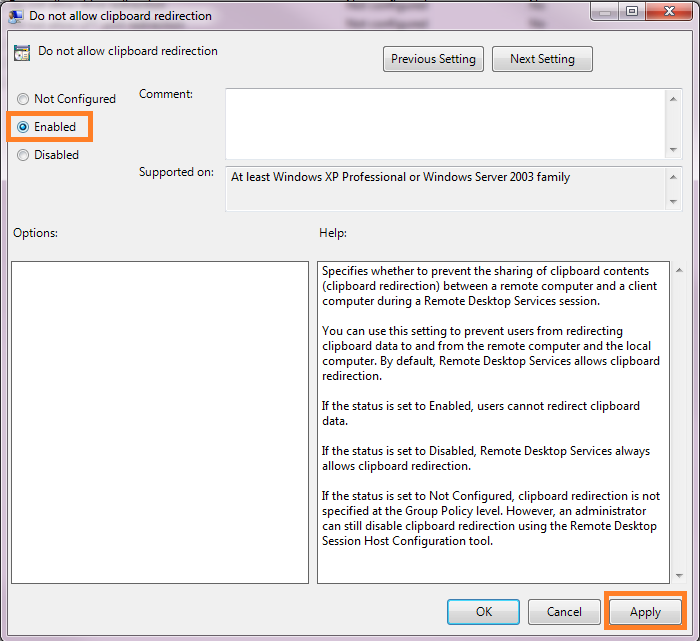
  5. A Window named Do not allow clipboard redirection will be shown.
  6. Click Enabled and Click Apply
    step b
  7. Make sure that all users will Log Off and then Login to implement this new settings.
  8. Done

Source
God Bless!

Thanks,
Thomie

Signalr – OnDisconnect(bool stopCalled)

Most of us who are using .Net as our Programming language use Signalr as our Real-Time Framework. And we implement OnDisconnect in most cases to catch clients that have been disconnected. Since then there were no parameter included as an Overload of the said method. Lately on the latest releases by the Signalr team they have included an Overload so that we can distinguish what triggers the disconnection and help us manage our Apps behavior to it.

With this said I have one experience that I want to share as this may also frustrate some people who are counting connected users and having a problem that when their app have multi workers (Web Garden) they app somehow always trigger OnDisconnect even if the user is still connect. So I want to share this findings on how to properly address it.

  1. Make sure that the App is using a Backplane to manage connection on your hub so that the connections are shared on all threads/servers. I use SQLServer.
  2. Make sure to use the Database on counting your list of connection and tagging who is who. Because in memory List even its static will not be shared on a different server (obviously).
  3. Make sure to trigger disconnection action when the OnDisconnect is called with the stopCalled is equal to true.

Let me highlight what is stopCalled is equal to true means.

  1. It returns true if the method on the connection to close is trigger
  2. It returns true if the browser is called
  3. It returns false if the timeout has been met

Hope this instructions will help you manage your site as it help me on our projects.

God Bless!

Thanks,
Thomie

RockRMS : Free Relationship Management System

RockRMS

I have been searching for an Open Source management of our church that is also created on ASP .Net. I have found RockRMS. RockRMS is created using ASP .Net Web Form that is so dynamic and Scale-able it can accommodate both external website and internal operation of a Church. There is even a dedicated hosting that will maintain your system and is hosted on Windows Azure.

Its source code is also available on GitHub so others can contribute to the pipeline. You may visit their website at https://www.rockrms.com/

Here are some of the screenshots provided on their website:


God Bless!

Thanks,
Thomie

Pechkin – NET Wrapper for WkHtmlToPdf

Pechkin

.NET Wrapper for WkHtmlToPdf DLL, library that uses Webkit engine to convert HTML pages to PDF. It is now available on Nuget for easy installation on your Visual Studio Solution/Projects.

How easy is it to use? Just install it via Nuget and add a reference on your code then use either one of the following:

byte[] pdfBuf = new SimplePechkin(new GlobalConfig()).Convert("<html><body><h1>Hello world!</h1></body></html>");

and

// create global configuration object
GlobalConfig gc = new GlobalConfig();

// set it up using fluent notation
gc.SetMargins(new Margins(300, 100, 150, 100))
  .SetDocumentTitle("Test document")
  .SetPaperSize(PaperKind.Letter);
//... etc

// create converter
IPechkin pechkin = new SynchronizedPechkin(gc);

// subscribe to events
pechkin.Begin += OnBegin;
pechkin.Error += OnError;
pechkin.Warning += OnWarning;
pechkin.PhaseChanged += OnPhase;
pechkin.ProgressChanged += OnProgress;
pechkin.Finished += OnFinished;

// create document configuration object
ObjectConfig oc = new ObjectConfig();

// and set it up using fluent notation too
oc.SetCreateExternalLinks(false)
  .SetFallbackEncoding(Encoding.ASCII)
  .SetLoadImages(false)
  .SetPageUri("http://google.com");
//... etc

// convert document
byte[] pdfBuf = pechkin.Convert(oc);


God Bless!

Thanks,
Thomie

MSSQL – Execution Plan Caching and Recompiling

Hi,

Have you every experience that you have a stored procedure(SP) that have plenty of parameters that when 1 set of parameter is executed for the very first time the said SPwas created, its fast. Then after you have a new set of parameter passed to the same SP you’ll end up a long execution process?

Then that is because of a so called Execution Plan Caching that MSSQL is doing on your query. In an overview MSSQL check if there is an existing execution plan for the SP. If there is none, it will create an optimized execution plan, compile, and then cache it on memory. So when the same SP is executed with the same number of parameter it will be reused.

So in cases that you have the same number of parameter every time you use the said stored procedure and you know that you have a logic that will change the query result then this optimization may not be on our side.

When does this caching is cleared? It is only cleared when either there are no memory allocation for MSSQL or you force MSSQL to recompile the SP.

How to Recompile your specific SP? Just add OPTION (RECOMPILE) at the end of your query, before the END statement, and you are ready to go. In some cases you may want to force all cache to be removed, you need to use another statement to do that and that is DBCC FREEPROCCACHE.

That’s it. Hope it helped you as it helped me on my project.

God Bless!
Thanks,
Thomie

MSSQL – Drop all SP and Table on a Database

Execute this with Precaution

USE YourDataBaseName
declare @procName varchar(500)
declare cur cursor
for select [name] from sys.objects where type = ‘p’
open cur
fetch next from cur into @procName
while @@fetch_status = 0
begin
exec(‘drop procedure [‘ + @procName+’]’)
fetch next from cur into @procName
end
close cur
deallocate cur
EXEC sp_MSforeachtable @command1 = “DROP TABLE [?]”


MSSQL – Count Number of Records on Each Table

Here is the script to count all the number of records on each table on a MSSQL Server:


SELECT sc.name +’.’+ ta.name TableName
,SUM(pa.rows) RowCnt
FROM sys.tables ta
INNER JOIN sys.partitions pa
ON pa.OBJECT_ID = ta.OBJECT_ID
INNER JOIN sys.schemas sc
ON ta.schema_id = sc.schema_id
WHERE ta.is_ms_shipped = 0 AND pa.index_id IN (1,0)
GROUP BY sc.name,ta.name
ORDER BY SUM(pa.rows) DESC

Hope it helps.

God Bless!
Thanks,
Thomie

TCP and C# Connecting via Lan

Have you ever thought that you want to connect to create an application that can talk via LAN? Then TCP is one of the mode that you can choose one. Here are the codes from MSDN that can help you:

TCPListen – This is used when you want to create a server like application.

using System;
using System.Collections.Generic;
using System.Linq;
using System.Net;
using System.Net.Sockets;
using System.Text;
using System.Threading.Tasks;

namespace TCPListen
{
class Program
{
static void Main(string[] args)
{
TcpListener server = null;
try
{
// Set the TcpListener on port 13000.
Int32 port = 13000;
IPAddress localAddr = IPAddress.Parse("127.0.0.1");

// TcpListener server = new TcpListener(port);
server = new TcpListener(localAddr, port);

// Start listening for client requests.
server.Start();

// Buffer for reading data
Byte[] bytes = new Byte[256];
String data = null;

// Enter the listening loop.
while (true)
{
Console.Write("Waiting for a connection... ");

// Perform a blocking call to accept requests.
// You could also user server.AcceptSocket() here.
TcpClient client = server.AcceptTcpClient();
Console.WriteLine("Connected!");

data = null;

// Get a stream object for reading and writing
NetworkStream stream = client.GetStream();

int i;

// Loop to receive all the data sent by the client.
while ((i = stream.Read(bytes, 0, bytes.Length)) != 0)
{
// Translate data bytes to a ASCII string.
data = System.Text.Encoding.ASCII.GetString(bytes, 0, i);
Console.WriteLine("Received: {0}", data);

// Process the data sent by the client.
data = data.ToUpper();

byte[] msg = System.Text.Encoding.ASCII.GetBytes(data);

// Send back a response.
stream.Write(msg, 0, msg.Length);
Console.WriteLine("Sent: {0}", data);
}

// Shutdown and end connection
client.Close();
}
}
catch (SocketException e)
{
Console.WriteLine("SocketException: {0}", e);
}
finally
{
// Stop listening for new clients.
server.Stop();
}

Console.WriteLine("\nHit enter to continue...");
Console.Read();
}
}
}

TCPClient – As the name suggest it will be used to create the client that will connect to our server.

using System;
using System.Collections.Generic;
using System.Linq;
using System.Net;
using System.Net.Sockets;
using System.Text;
using System.Threading.Tasks;

namespace TCPListen
{
class Program
{
static void Main(string[] args)
{
TcpListener server = null;
try
{
// Set the TcpListener on port 13000.
Int32 port = 13000;
IPAddress localAddr = IPAddress.Parse("127.0.0.1");

// TcpListener server = new TcpListener(port);
server = new TcpListener(localAddr, port);

// Start listening for client requests.
server.Start();

// Buffer for reading data
Byte[] bytes = new Byte[256];
String data = null;

// Enter the listening loop.
while (true)
{
Console.Write("Waiting for a connection... ");

// Perform a blocking call to accept requests.
// You could also user server.AcceptSocket() here.
TcpClient client = server.AcceptTcpClient();
Console.WriteLine("Connected!");

data = null;

// Get a stream object for reading and writing
NetworkStream stream = client.GetStream();

int i;

// Loop to receive all the data sent by the client.
while ((i = stream.Read(bytes, 0, bytes.Length)) != 0)
{
// Translate data bytes to a ASCII string.
data = System.Text.Encoding.ASCII.GetString(bytes, 0, i);
Console.WriteLine("Received: {0}", data);

// Process the data sent by the client.
data = data.ToUpper();

byte[] msg = System.Text.Encoding.ASCII.GetBytes(data);

// Send back a response.
stream.Write(msg, 0, msg.Length);
Console.WriteLine("Sent: {0}", data);
}

// Shutdown and end connection
client.Close();
}
}
catch (SocketException e)
{
Console.WriteLine("SocketException: {0}", e);
}
finally
{
// Stop listening for new clients.
server.Stop();
}

Console.WriteLine("\nHit enter to continue...");
Console.Read();
}
}
}

God Bless!

Thanks,
Thomie

Opencast, Your Free and Open Video Casting!

Hi There,

We are glad to invite you to our first Free service product, OpenCast. OpenCast is an online broadcasting websites that aim to help people broadcast freely and openly. The website is created using ASP.Net MVC, Entity Framework, SignalR, & OpenTok.


Feel Free to register now at http://opencast.info

God Bless!

Thanks,
Thomie

Binding SSL Cerificate to a Machine

Prequisites

  • SSL Certificate (For Testing this can be self-signed)
  • Administrator Rights
  • Command Prompt
  • IIS 7 or above

Instructions

  1. Open the Certificate details and find its ThumbPrint in IIS
  2. Identify the port and IP to which the certificate to be binded
  3. Open the Command Prompt with Administrator Rights
  4. Type in the following
    netsh http add sslcert ipport=<IPtoBind>:<PortToBind> appid={12345678-db90-4b66-8b01-88f7af2e36bf} certhash=<CertificateThumbPrint>
  5. Done
  6. To remove that binding just type the following
    netsh http delete sslcert ipport=<IPtoBinded>:<PortToBinded>

[MSSQL] Truncate all Table

Truncating all tables is not easy by default on MSSQL so I have search the net and found one. Just open up a new query and use the following codes:

Use databaseName
GO

EXEC sp_MSForEachTable ‘TRUNCATE TABLE ?’
GO

It will truncate all the tables under the databaseName DB.

God Bless!

Thanks,
Thomie

jQuery: FullCalendar

Name: FullCalendar

Description: Most users find developing their own calendar UI not that quite easy but with jQuery FullCalendar you make it easy and fast!


Some of Specifications:

Demo: http://arshaw.com/fullcalendar/

Download: http://arshaw.com/fullcalendar/download/