Category Archives: Blog

Powershell GetADUser Name vs DisplayName

When using GetADUser usually we are using the default properties it return. This usually not the case and when we were using it as the property Name it doesn’t update when user’s name got updated. To facilitate this use DisplayName.

$user= Get-ADUser -Filter {UserPrincipalName -eq ’[email protected]’ -or EmailAddress -eq ’[email protected]’} -Properties EmailAddress,DisplayName

$user.DisplayName

Backup and Restore MSSQL Database with Temporal Tables

Some of us are now using Temporal Tables in most purpose to have historical information on our records. Its interesting that the current SSMS doesn’t have this available and using the said feature will result that Temporal Tables are not restored correctly.

To backup database with Temporal tables use the following code:

BACKUP DATABASE YourDatabase
TO DISK = ‘C:\Backup\YourDatabase.bak’
WITH FORMAT;

To restore the database use the following:

RESTORE DATABASE YourDatabase
FROM DISK = ‘C:\Backup\YourDatabase.bak’
WITH REPLACE;

Add another AD account as admin on AAD joined machine

There is a superuser article that was able to resolve this using the following steps:

  1. Login to the PC as the Azure AD user you want to be a local admin. This gets the GUID onto the PC.
  2. Log out as that user and login as a local admin user.
  3. Open a command prompt as Administrator and using the command line, add the user to the administrators group. As an example, if I had a user called John Doe, the command would be net localgroup administrators AzureAD\JohnDoe /add.

https://superuser.com/questions/982336/how-do-i-add-azure-active-directory-user-to-local-administrators-group

SQL: Run SQL Job via Stored Procedure

Here is stored procedure that you can use so that you can run your SQL Job manually via script. It already factored in to check the SQL JOB if its running already or not so that it will just wait that run to finish instead of queuing another one.

CREATE PROC [dbo].[usp_SQLJOB_EXEC] @JobName NVARCHAR(MAX)
AS
	DECLARE @JobID UNIQUEIDENTIFIER;

    -- Get the Job ID
    SELECT @JobID = job_id
    FROM msdb.dbo.sysjobs
    WHERE name = @JobName;

    -- Check if the job exists
    IF @JobID IS NOT NULL
    BEGIN
		DECLARE @IsJobRunning BIT = 1;
		SELECT @IsJobRunning = CASE WHEN EXISTS (
                SELECT 1
                FROM msdb.dbo.sysjobactivity
                WHERE job_id = @JobID
                AND run_requested_date >= DATEADD(dd, -1, GETDATE())
                AND stop_execution_date is null
            ) THEN 1 ELSE 0 END;
        -- Start the job
		IF(@IsJobRunning = 0)
		BEGIN
			EXEC msdb.dbo.sp_start_job @job_name = @JobName;
			SET @IsJobRunning = 1
		END
        

        -- Loop to check the job status
        WHILE @IsJobRunning = 1
        BEGIN
            -- Check if the job is still running
            SELECT @IsJobRunning = CASE WHEN EXISTS (
                SELECT 1
                FROM msdb.dbo.sysjobactivity
                WHERE job_id = @JobID
                AND run_requested_date >= DATEADD(dd, -1, GETDATE())
                AND stop_execution_date is null
            ) THEN 1 ELSE 0 END;

            -- Break the loop if the job is completed
            IF @IsJobRunning = 0
                BREAK;

            -- Wait for a few seconds before checking again
            WAITFOR DELAY '00:00:05'; -- Adjust the delay time as needed
        END;
    END
    ELSE
    BEGIN
        PRINT 'Job not found';
    END

SQL Job using LINK Server using Service Account

There are usual errors when using a LINK Server while also using a Service account on SQL Job. Usual errors are as follows:

  1. Access to the Remote Server is Denied Because the Current Security Context is not Trusted
  2. EXECUTE AS USER failed for the requested [user] dbo in the [database]
  3. After resolving those 2 issue its still failed

Assumptions of your setup:

  1. You have created a credential object under Security > Credentials
  2. You have created a proxy that is using that credential under SQL Server Agent > Proxies > Operating System (CmdExec)

Here are the steps you need to do:

  1. Change database TRUSTWORTY to ON

    ALTER DATABASE SQLDB0 SET TRUSTWORTHY ON
    GO

  2. Reapply database owner. This is needed because the SID recorded is now mismatch. c/o Rob Reid on this post.

    ALTER AUTHORIZATION ON Database::[database] TO [domain\user]
  3. Update your SQL Job step to use CmdExec instead of T-SQL

    Job Step Properties
    – Type: Operating system (CmdExec)
    – Run as: Your service account credentials using a proxy
    – Command
    SQLCMD -I -b -S $(ESCAPE_DQUOTE(SRVR)) -d DatabaseName -Q"EXEC usp_YourStoredProcedure"

PowerBI: Change calculation on child value of Pivot

Measure = 
VAR IsLowestLevel =
    HASONEVALUE(Table[RowColumn1]) &&
    HASONEVALUE(Table[RowColumn2]) &&
    HASONEVALUE(Table[RowColumn3]) &&
    HASONEVALUE(Table[RowColumn4]) &&
    HASONEVALUE(Table[RowColumn5])

VAR Is2ndToTheLowestLevel =
    HASONEVALUE(Table[RowColumn1]) &&
    HASONEVALUE(Table[RowColumn2]) &&
    HASONEVALUE(Table[RowColumn3]) &&
    HASONEVALUE(Table[RowColumn4]) 


RETURN
IFERROR(IF (
    IsLowestLevel,
    [BaseColumnToCompute1]/
    SUMX(
        FILTER(
            ALL(Table),
            Table[GlobalFilter1] = SELECTEDVALUE(Table[GlobalFilter1]) &&            
            Table[RowColumn1] = SELECTEDVALUE(Table[RowColumn1]) &&
            Table[RowColumn2] = SELECTEDVALUE(Table[RowColumn2]) &&
            Table[RowColumn3] = SELECTEDVALUE(Table[RowColumn3]) &&
            Table[RowColumn3] = SELECTEDVALUE(Table[RowColumn4])
        ),
        [BaseColumnToCompute1]+500 /*Sample custom compute*/
    ),
    IF (
        Is2ndToTheLowestLevel,
        [BaseColumnToCompute1]/
        (SUMX(
            FILTER(
                ALL(Table),
                Table[GlobalFilter1] = SELECTEDVALUE(Table[GlobalFilter1]) &&            
                Table[RowColumn1] = SELECTEDVALUE(Table[RowColumn1]) &&
                Table[RowColumn2] = SELECTEDVALUE(Table[RowColumn2]) &&
                Table[RowColumn3] = SELECTEDVALUE(Table[RowColumn3])
            ),
            [BaseColumnToCompute1]+1000 /*Sample custom compute*/
        )),
        [DefaultBaseColumnToCompute1]
    )
),0)

Visual Studio Extension -Ngrok

Ngrok is now widely being used. From simple web development up to complex development. Is hard to run Ngrok everytime you are coding specially when using IIS Express that if not configured to use a specific IP it will generate random port which is a hard to map.

Thankfully there is a plug-in for our beloved Visual Studio to integrate this.

Ngrok Extensions

With Ngrok Extension we only open our Visual Studio solution and navigate to Tool>Start ngrok Tunnel and it will create a tunnel for the websites under your solution.

Try it now!

God Bless!

Thanks,
Thomie

Ngrok – Free Web Tunneling

In the verge of today’s web development we encounter cases that in order to proceed we need to have a public accessible URL. Thankfully, Ngrok provide a free service to do this.

What it does is tunnel your machine to a Ngrok URL with a specific port. We just need to download the ngrok.exe from their website and run the command like

ngrok http 80


With this command your service on your local machine that is running on port 80 will be mapped and accessible publicly for FREE. For a full documentation view it here.

God Bless!

Thanks,
Thomie

Replace words on MS Word using C#

Hi,

Recently I was instructed to create an application that will be able to replace an array of words and replace them with an array of corresponding words on an MS Word document. With this I’ve searched the following:

Prerequisites

  1. Visual Stduio
  2. Install the nuget package DocX
  3. Administrative access on the context the application is running

Code

Dictionary<string, string> lReplacements = new Dictionary<string, string>();
string newFullPath = @”c:\sample.docx”;

using (DocX document = DocX.Load(newFullPath))
{

//for loop is better than foreach
foreach (var item in lReplacements)
{

document.ReplaceText(item.Key, item.Value);

}
document.Save();

}

Hope it helped you as it helped me with this simple snippet.

God Bless!
Thanks,
Thomie

Convert Hard-drive from Dynamic to Basic

Hi,

Just recently we had a requirement to enable bitlocker on our development machines. Unfortunately you can’t use bitlocker on hard drive that of type DYNAMIC. So initially we were advised to have our machines reformatted. We all know that having our development machines reformatted will result to downtime on development task so I tried searching the web for solution and I found one.

As always for a peace of mind you may backup your files just in case you did something that is not part of the steps.


Summary

  1. Delete volume of the drive using Diskpart and convert drive to basic
  2. Use Gparted to recreate the volume
  3. Enable bitlocker

Details

  1. Create a Gparted bootable disk
    1. Download the latest YUMI Multiboot creator
    2. Download the latest GParted ISO either the x64 or the one that is compatible to your machine
    3. Insert the USB drive to your machine
    4. Run YUMI
    5. On Step 1 select the USB drive and check on Format drive preferably as FAT32
    6. On Step 2 select Gparted
    7. On Step 3 locate the downloaded ISO file from Step 1.2
    8. Click Create and wait for the USB drive to be created successfully
    9. Keep it for now as we will use it later
  2. Create a local administrator
    1. This is a different from a domain admin that is created for corporate machine this is an account that binded only to your machine
    2. To create open Computer Management
    3. Navigate to Local User admin Groups > Users
    4. Right click and select New User
    5. Fill up the following accordingly
      1. User name
      2. Full Name
      3. Password
      4. Confirm Password
      5. User must change password at next logon : UNCHECKED
    6. Double click on the newly created account and select the Member of Tab
    7. Click Add and search for Administrators
  3. Boot your machine to command prompt, on our Machine we are using Windows 10 and below are the steps to boot to the command prompt
    1. On your task bar go to All Settings
    2. Select Update & Security
    3. Select Recovery
    4. Under Advance startup click on Restart Now
    5. Your machine will restart
    6. On the said screen navigate to find the Command Prompt usually it is found by:
      1. Troubleshooting > Advanced > Command prompt
      2. Then select the local admin you have created on Step #2
    7. Type in Diskpart
    8. Type in  list disk take note of the disk you want to convert to basic
    9. Type in select disk <disknumber>
    10. Type in detail disk take note of the details for later reference #3.10
    11. This time we will delete all the volume of the said disk by
      1. select volume <volumenumber>
      2. delete volume
      3. Repeat step untill all volume has been deleted
    12. When all volumes has been deleted you may now convert that selected disk on #3.10 by typing convert basic
    13. Now our disk is converted to basic we need to reboot our machine and boot unto our USB live drive that we have created on Step #1
  4. After booting up on the USB Drive just look for the Gparted and just press enter until you see the desktop of Gparted
    1. Open GParted app and make sure that the drive we wanted to convert to basic is showing unallocated as we have deleted the volume on Step #3
    2. Now open terminal and type the following steps
      1. sudo -s
      2. testdisk
        1. On the testdisk follow this steps
          1. Select No Log.
          2. Select the disk drive you want to recover, e.g. /dev/sdc.
          3. Select your partition table type. Usually it’s Intel.
          4. Select Analyse and Quick Search.
          5. If you get asked whether your partition was created under Vista, answer yes/no.
          6. Your drive will be analysed and you will see a list of all found partitions. If you know what you are doing, you can edit the list, but usually that list is already the volume we’ve got on Step #3.10 and if yes just press Enter.
          7. On the next screen you have the option to either perform a second Deeper Search, or Write the current partition table to disk. If the quick search, which we checked if it matched our volume on Step #3.10, was successful, choose Write.
      3. Close and Open the GParted app to verify the changes
      4. If all is well you can now exit GParted and boot again
  5. Your machine will now boot properly and your drive will now be on Basic type.
  6. You can now enable bitlocker as needed.


Hope it helped you as it did to me.


God Bless!

Thanks,
Thomie


Referrences:

https://www.partition-tool.com/easeus-partition-manager/convert-dynamic-disk-to-basic-disk.htm

https://www.pendrivelinux.com/yumi-multiboot-usb-creator/

https://gparted.org/download.php

https://ubuverse.com/recover-a-disk-partition-with-testdisk-and-gparted-live/

FotoJet Create Collage Online!

I was requested to review this tool called FotoJet. And what can I say is “Its worth it”. Let me tell you why with this technical review.

Programming Language

The programming language used is Action Script i think because its running under the context of Adobe Flash Player. Even though they have mobile have which is very nice and we’ll review it on another session.

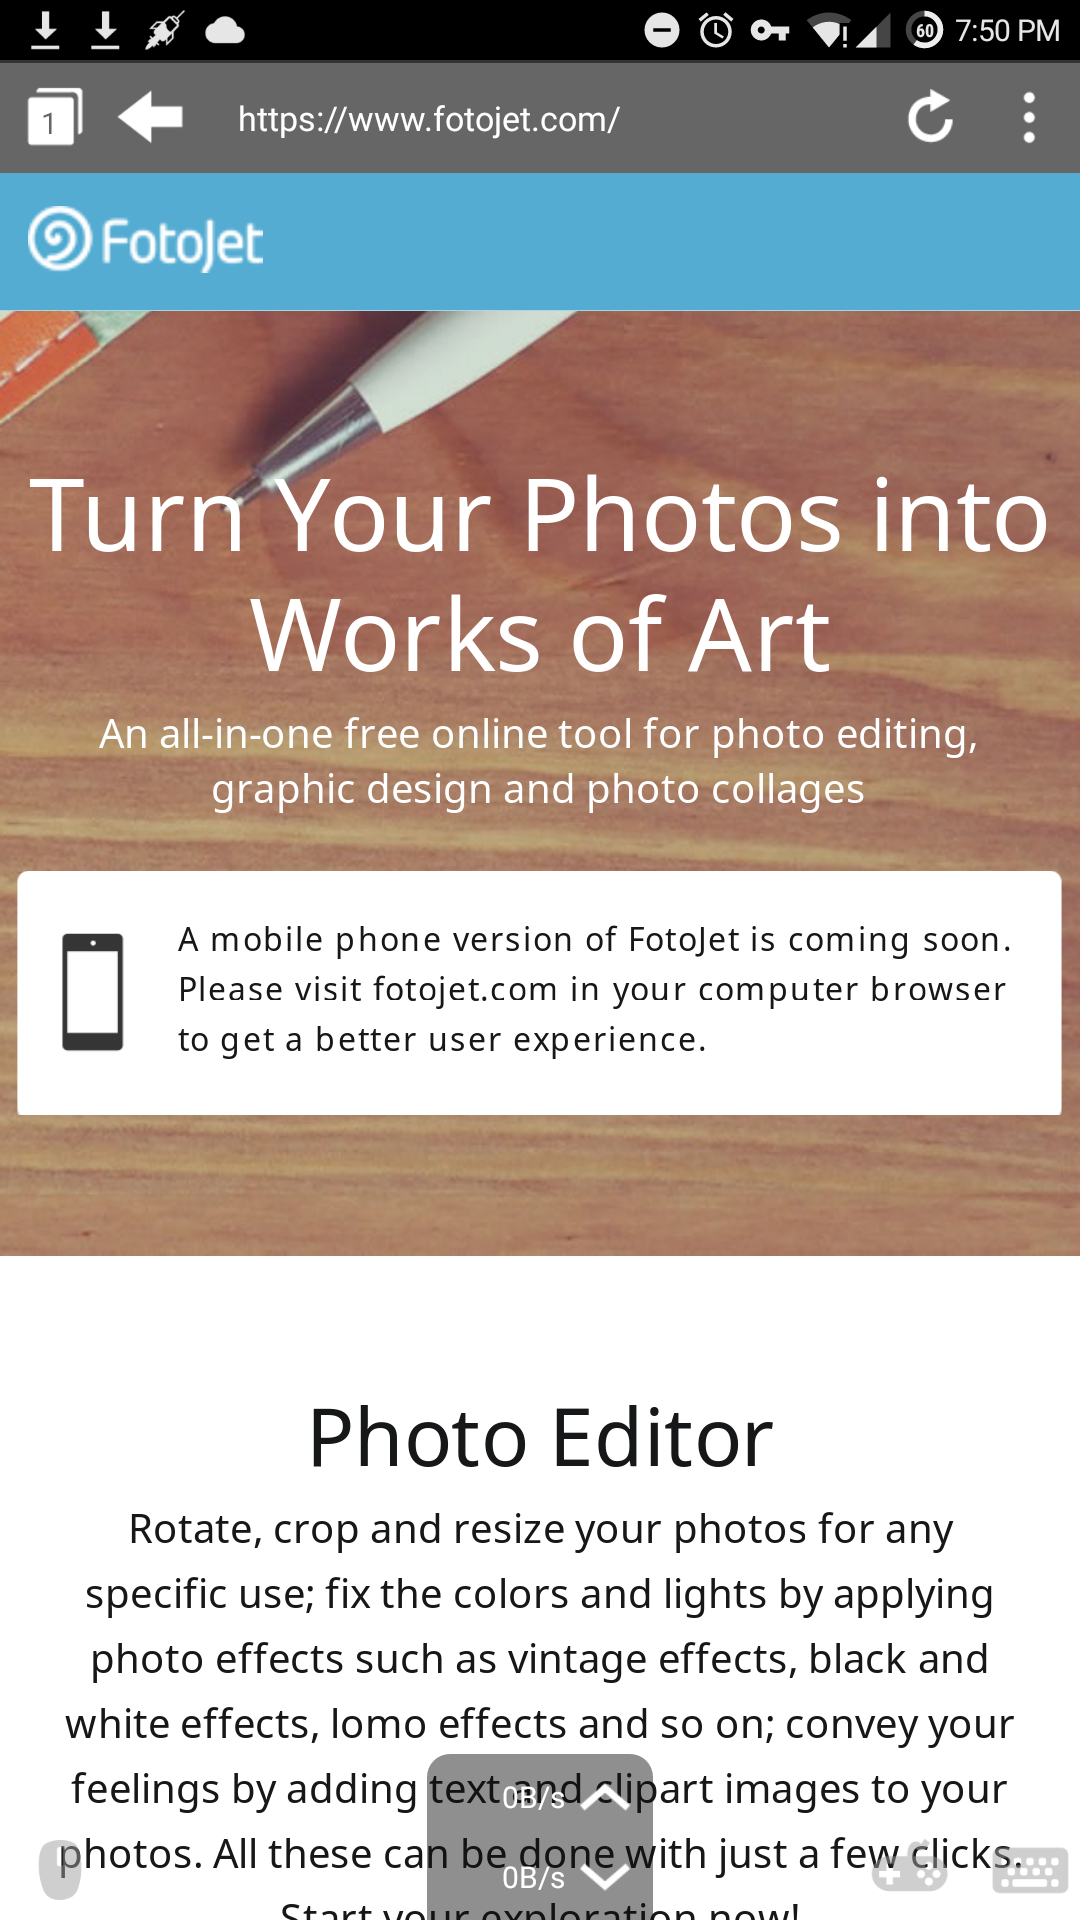
If you want to use fotojet web make sure you are accessing it on a desktop because it is design for a desktop environment. Even though there is a browser that is capabale of running Adobe Flash Player like Puffin it is not designed to work on a mobile environment which it is detecting via the said screenshot.

UI

The ui is like you are using a desktop application which give a native app feel. It has inbuilt ui guided step by step to creage your wonderful collage.

Input and Output

Its input just require your image to be browsed and all the design can be done via the web app itself. It has also inbuilt font but some of them need payment which is explainable due to copyright or agreements I think.

In any case after building with the app I am satisfied with how easy it is to create one. Here are the samples I created that I loved much.

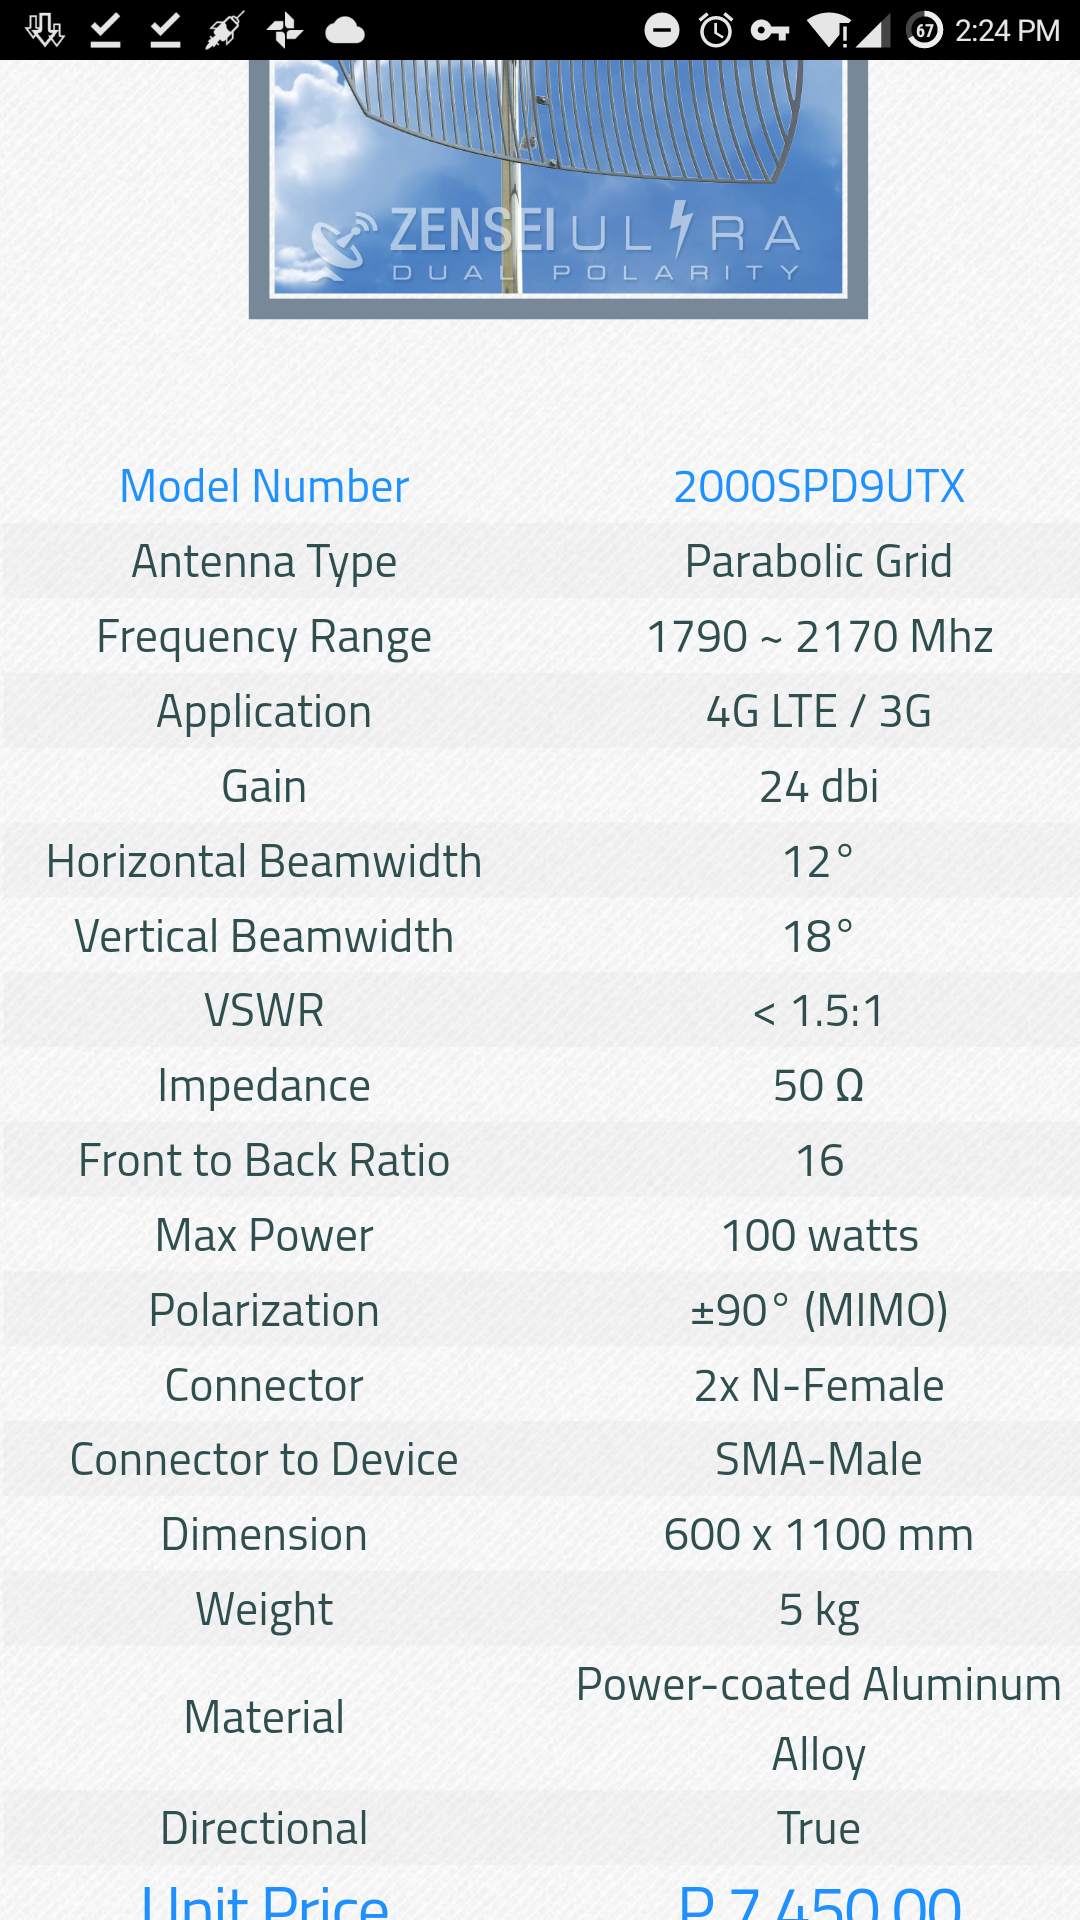
Review: Skywave Zensei Ultra Dual Polarity Antenna

In a mist of an island which is a case of my wife’s family is a need for a remote way to access internet. Here in my mother-in-law residence internet connection is a difficulty. You get internet connection in a few minutes and none for few minutes also. There are cases that I meed internet connection and we had to go thru an exploration just to get a internet from a neighbor.

Today is diffrent. We constructed to have a modem along with a Skywave Zensei Ultra Dual Polarity Antenna and poof its worth it. Let me explain why.

Powerful Gain

With the 2×24 dbi gain it absolutely give you the boost that your modem needs. From a 1 to none bar of signal that you get of your modem you will really get 3-full bar of signal that can give yo the experience of internet just like if you are on the Urban area. I will assure you that with proper implementation you’ll get satisfied with it.

A thought material

Its build with a high grade aluminum that is power-coated that will surely stand most climate on your area. We had experienced it on thought wind and it never bend with the help of its dual clamping tools that I really loved.

The frequency

Its frequency is a good coverage 1790~2170 Mhz will cover your 3G and 4G need. Just make sure that your area cover those frequency before proceeding with the purchase.

Conclusion

If you want get a boost and be satisfied I strongly suggest to buy one. Its not that cheap to buy one but investing to have a wonderful internet experience, specially to your love ones, will make it a worth. It cost P7450.00 c/o uplift.ph which has Cash on Deliver and comes with a 10m cable or upgrade it with a fee.

God Bless and Happy New Year!

PhoneGap Installation Guide – Windows

Hi,

Since we need to have a guide for our teammate I have decided that instead of teaching how to install one by one to my colleagues I will create an online user guide so that any other person online that will be also looking for guide will also have the help that they need. So lets get started.

Prerequisites


Installation Guide

  1. Install JDK, just proceed with standard installation process.
  2. Install Android Studio, just proceed with standard installation process. Please note that during the installation phase it will also download the Android SDK with is more than 3GB. PLEASE NOTE OF THE SDK INSTALLATION FOLDER AS THIS WILL BE USED ON LATER PROCEDURE.
  3. Install Aptana, just proceed with standard installation process. Please also note that during installation phase it will also download some prerequisite application including Node.js& Git
  4. Go to START and look for Command Prompt and run it as Administrator.
  5. Type the command below and press enter and wait for the installation process to finish. It will take a while depending on your internet connection.
    npm install -g cordova
    npm install -g proto-list
    npm install -g os-tmpdir
    npm install -g os-homedir
    npm install -g are-we-there-yet
    npm install -g gauge
    npm install -g ansi
    npm install -g is-absolute
    npm install -g asap
    npm install -g minimatch
    npm install -g path-is-absolute
    npm install -g validate-npm-package-license
    npm install -g is-builtin-module
    npm install -g concat-stream
    npm install -g json-parse-helpfulerror
    npm install -g block-stream
    npm install -g fstream-ignore
    npm install -g readdir-scoped-modules
    npm install -g debuglog
    npm install -g lodash._baseflatten
    npm install -g lodash._baseuniq
    npm install -g lodash.restparam
    npm install -g unique-slug
    npm install -g phonegap
  6. After the installation close all window.
  7. Restart your Machine.
  8. Go to your SDK folder that is indicated during the installation of the Android Studio.
  9. Run SDK Manager and install most of the needed SDK, you may install all the SDK if you want to be sure. It will take a while to install depending on your internet connection.
  10. Run AVD Manager and create a virtual device.
  11. You may now proceed with the creation of your PhoneGap app.


You may also want to take note the following update on the Environment Variable if it is needed on your side.

ANT_HOME=C:\path\to\ant\folder\apache-ant-1.9.4
ANDROID_HOME=C:\path\to\the\folder\of\Android\sdk
JAVA_HOME = C:\Program Files (x86)\Java\jdk1.7.0_79

PATH
Append;%ANDROID_HOME%\tools;%ANDROID_HOME%\platform-tools;%JAVA_HOME%\bin;%ANT_HOME%\bin

GCF-East.com is live

As I am looking for an opportunity to serve our church thru a ministry, I was blessed to have it in such a way that it is align to my profession of creating website. With the team that composed of several persons I had volunteered to become the programmer. With the tools at hand I also used the same set of items and skill set in order to convert the provided design, concept, phases, and sections smoothly on http://www.gcf-east.com

It composes of several sections:

  • Home
  • About Us
  • Events and Announcements
  • Resources
  • Connect

Soon it will host several videos and audible of sermon that will blessed visitors and will know God along with it.

God Bless!
Thanks,
Thomie

Signalr – OnDisconnect(bool stopCalled)

Most of us who are using .Net as our Programming language use Signalr as our Real-Time Framework. And we implement OnDisconnect in most cases to catch clients that have been disconnected. Since then there were no parameter included as an Overload of the said method. Lately on the latest releases by the Signalr team they have included an Overload so that we can distinguish what triggers the disconnection and help us manage our Apps behavior to it.

With this said I have one experience that I want to share as this may also frustrate some people who are counting connected users and having a problem that when their app have multi workers (Web Garden) they app somehow always trigger OnDisconnect even if the user is still connect. So I want to share this findings on how to properly address it.

  1. Make sure that the App is using a Backplane to manage connection on your hub so that the connections are shared on all threads/servers. I use SQLServer.
  2. Make sure to use the Database on counting your list of connection and tagging who is who. Because in memory List even its static will not be shared on a different server (obviously).
  3. Make sure to trigger disconnection action when the OnDisconnect is called with the stopCalled is equal to true.

Let me highlight what is stopCalled is equal to true means.

  1. It returns true if the method on the connection to close is trigger
  2. It returns true if the browser is called
  3. It returns false if the timeout has been met

Hope this instructions will help you manage your site as it help me on our projects.

God Bless!

Thanks,
Thomie

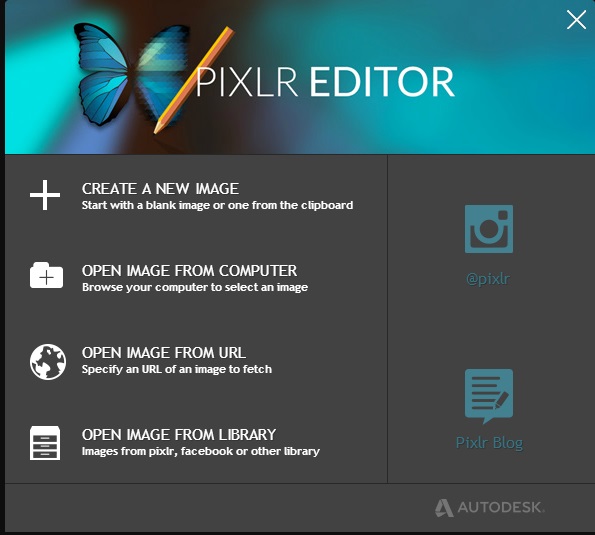
Pixlr Editor : Online Photo Editor

pixlr-editor-startup-screen

I have been before looking for an online application to edit my images without thinking of any licensing and subscription. An online editor that you can be used even on your tablet (tried it with a mouse and keyboard) and your my desktop. With that said I have found Pixlr Editor.

Pixlr Editor has many feature that is familiar with Adobe Photoshop. I t has fill, magic wand, layering, and even a way to connect to your Picasa account. It is also wonderful to note that is a tool that is now under Autodesk. Try it now be clicking here.


God Bless!

Thanks,
Thomie

Google’s My Maps

Many of us give other person direction by giving them the location in Google Maps by using a Pointer. But there is a more accurate way to give directions to our peers and love ones.

Introducing Google My Maps. Google My Maps allows you to create your own map with directions, pointers, and even allow collaborations among other Google users. 

In order to start here is a simple step:

  1. Go to Google Maps
  2. Login your Google Account
  3. Create a New Map
  4. Do mapping and pointing
  5. Save, Share, Collaborate

I have use this for my referrals so that they can know the exact way they need to go when they are invited for an interview. I hope this also help you as it help me.

God Bless!

Thanks,

Thomie

How to Reformat a Cherry Mobile Alpha Play using WIMBoot

First of All Credits to: Rae Kevin Turno Monzon From Cherry mobile alpha play FB Group

How to reformat/reset to factory defaults your Cherry Mobile Alpha Play
using WIMBOOT

For more information about WIMBOOT, please refer to this link:
http://technet.microsoft.com/en-us/library/dn594399.aspx

====================
=====DISCLAIMER=======
====================

Please read the following:

I, (state your name), will be held responsible to whatever happens to my device while following this tutorial.

The creator of this tutorial will not be responsible for any damages, loss of data, loss of warranty, untoward incident or anything that might held the creator responsible for the damages.

I will be careful and knowledgeable enough to follow the instructions provided in this tutorial.

====================
=====DISCLAIMER=======
====================

What is needed/required:
-knowledge on how to install an OS to a computer
-knowledge to use command prompt
-patience (important)
-Cherry Mobile Alpha Play
-bootable Windows 8.1 media (flash drive 8GB+/hard drive/dvd drive)
-Install.wim from the recovery drive (hidden partition of CMAP)
-USB Keyboard
-USB Mouse
-USB Hub

Before we start:
-please back up all your important data
-please make sure your device is connected to the power adapter
-please connect your USB mouse and keyboard to the device
-please plug the bootable Windows 8.1 media to the device
-please remove any micro sd plugged on your device(ignore this if your bootable device is the micro sd card)
-this tutorial assumes that you have the recovery drive data on the bootable media (D:\Windows Images\Install.wim)

Instructions:

Boot into the BIOS by pressing DEL on the keyboard while turning on your device
http://goo.gl/4nhA1p

Go to “Save & Exit”
http://goo.gl/1aXqbo

Select your bootable media (UEFI: YOUR USB DRIVE) and Press Enter
http://goo.gl/Gyh77R

Wait until you see the “Windows Setup” Screen
http://goo.gl/Cp25uA

Press Next

Click on “Repair Your Computer”
http://goo.gl/z10wFx

Click on “Troubleshoot”
http://goo.gl/i9zK8T

Click on “Advanced Options”
http://goo.gl/d7O2ok

Click on “Command Prompt”
http://goo.gl/j17cHT

You will now be presented with a single command prompt screen
http://goo.gl/ar9h0Y

===Before proceeding please make sure your you said the disclaimer and read the text before the instructions===

Type the following:

DISKPART

SELECT DISK 0

CLEAN

CONVERT GPT

CREATE PARTITION EFI SIZE=100

FORMAT QUICK FS=FAT32 LABEL=”System”

CREATE PARTITION MSR SIZE=128

CREATE PARTITION PRIMARY

SHRINK MINIMUM=3700

FORMAT QUICK FS=NTFS LABEL=”Alpha Play”

ASSIGN LETTER=C

CREATE PARTITION PRIMARY

FORMAT QUICK FS=NTFS LABEL=”Recovery”

ASSIGN LETTER=M

SET ID=”de94bba4-06d1-4d40-a16a-bfd50179d6ac”

GPT ATTRIBUTES=0x8000000000000001

LIST VOLUME

EXIT

MD “M:\Windows Images\”

COPY “D:\Windows Images\Install.wim” “M:\Windows Images\Install.wim”

MD C:\Recycler\Scratch

DISM /Apply-Image /ImageFile:”M:\Windows Images\install.wim” /ApplyDir:C: /Index:1 /WIMBoot /ScratchDir:C:\Recycler\Scratch

C:\Windows\System32\bcdboot C:\Windows

EXIT

http://goo.gl/K15NZU
http://goo.gl/6nlypQ

===Whew end of Command prompt. Congratulate yourself if you successfully do this==

Remove bootable media (USB)

Click on “Turn off your PC”
http://goo.gl/qMUeMl

Power On your device
http://goo.gl/uPddEV

wait until an error shows up DO NOT CLICK
http://goo.gl/d7xsRR

OK!!!!

Press SHIFT + F10

(Hello again command prompt)
http://goo.gl/o5oClj

Type “REGEDIT” and press Enter
http://goo.gl/1oEoU2

Expand “HKEY_LOCAL_MACHINE”
http://goo.gl/EAUzqJ

Expand “SYSTEM”
http://goo.gl/AlQxm5

Expand “Setup”
http://goo.gl/BlnVEy

Expand “Status”
http://goo.gl/hg6TYU

Click “ChildCompletion”
http://goo.gl/iPsKUH

Double Click on “setup.exe”
http://goo.gl/Bm1bXF

Change Value Data from 1 to 3 then press OK
http://goo.gl/8A5vNU

Close Registry Editor

Close Command Prompt

Press OK on the Error Window
http://goo.gl/HSRIQ4

So… Congratulations and you’re done!!!
http://goo.gl/IwwPN6

Enjoy your freshly installed Windows 8.1 with Bing on your Cherry Mobile Alpha Play!

NOTE:
-please disable automatic updates on the Control Panel to avoid system bloating (loss of free space)
-images are only for reference and may not be exact as typed but please follow what is in the instructions
(dahil meron akong minodify sa system ko kaya hindi same)

Guys, paki share po ito sa lahat ng nangangailangan ng tulong sa pag reformat ng ating device.

Hindi po sa naghahanap ako ng karangalan pero mas mainam na po kung bibigyan niyo ako ng credits sa pag gawa ng tutorial na ito. Kahit simpleng “Credits to Rae Kevin Turno Monzon” lang po

Maraming salamat po at Merry Christmas!

Nga po pala!
Credits po kay Sir John Sebastian Tsukuyumi sa pag bigay ng tips kung pano makuha ang Recovery Data ng CMAP at pag bigay ng idea kung pano ireset to factory settings ang device natin!

Updated Install.wim File (separated in 5 parts para convenient ang download)
http://goo.gl/vS931r

Kung sakaling nag format ka ng hindi sinusunod ang steps pero wala kang drivers…
CHERRY MOBILE ALPHA PLAY DRIVERS (kayu na po bahala kung pano install yan hehe )
https://drive.google.com/open?id=0B6GADZuCykI5UlRKYW92T19mNUk&authuser=0
FreePerDay – Android : Anomaly Warzone Earth

FreePerDay app is Anomaly Warzone Earth

Anomaly Warzone Earth HD - screenshot thumbnail


Description

PocketGamer: “”If you’re a strategy fan, you need this game”” PLATINUM AWARD!
TouchGen: “”So engaging it’s almost impossible to put down”” EDITOR’S CHOICE!
TouchArcade: “”It nails!”” 5/5 STARS! GAME OF THE YEAR RUNNER-UP AWARD!
AppSpy: “”Fantastically intriguing take on reversing the roles in a Tower Defense game”” VERDICT: GREAT!
IGN: “”A perfect challenge for any strategist”” NOMINEE FOR BEST MOBILE STRATEGY AWARD!Award winning game Anomaly Warzone Earth HD turns tower defense on its head. This time you take control of the attacking force, pitting your heavily armored squad against the destructive towers of an alien horde. Carefully lead your squad through the invaders’ defenses, shattering their towers and turrets with special weapons and power-ups in this groundbreaking new experience in tower offense.- Experience a new type of tower defense game where you’re the attacking side
– Think tactically and choose the right squad, route, special weapons, and plan to guarantee success in Tower Offense strategy
– Gather resources strategically to buy and upgrade new and more powerful units
– Play for hours on end in engaging modes of play: Story Campaign and Squad Assault modes
– Immerse yourself in the cutting-edge graphics and atmospheric soundtrack

Description Source

Download Details

Link: Download

Password: tjsa.info

*Please send this page's link to your friend when sharing the app.
*App is originally purchased by the author and are DRM-free. 
*The Link is powered by i-cttech.com and will expire after 10 days. If link has been expired please advise via the comment bellow so we can update it for you.
*For questions and inquiries please email: tjsanagustin+freeperday©gmail.com

TCP and C# Connecting via Lan

Have you ever thought that you want to connect to create an application that can talk via LAN? Then TCP is one of the mode that you can choose one. Here are the codes from MSDN that can help you:

TCPListen – This is used when you want to create a server like application.

using System;
using System.Collections.Generic;
using System.Linq;
using System.Net;
using System.Net.Sockets;
using System.Text;
using System.Threading.Tasks;

namespace TCPListen
{
class Program
{
static void Main(string[] args)
{
TcpListener server = null;
try
{
// Set the TcpListener on port 13000.
Int32 port = 13000;
IPAddress localAddr = IPAddress.Parse("127.0.0.1");

// TcpListener server = new TcpListener(port);
server = new TcpListener(localAddr, port);

// Start listening for client requests.
server.Start();

// Buffer for reading data
Byte[] bytes = new Byte[256];
String data = null;

// Enter the listening loop.
while (true)
{
Console.Write("Waiting for a connection... ");

// Perform a blocking call to accept requests.
// You could also user server.AcceptSocket() here.
TcpClient client = server.AcceptTcpClient();
Console.WriteLine("Connected!");

data = null;

// Get a stream object for reading and writing
NetworkStream stream = client.GetStream();

int i;

// Loop to receive all the data sent by the client.
while ((i = stream.Read(bytes, 0, bytes.Length)) != 0)
{
// Translate data bytes to a ASCII string.
data = System.Text.Encoding.ASCII.GetString(bytes, 0, i);
Console.WriteLine("Received: {0}", data);

// Process the data sent by the client.
data = data.ToUpper();

byte[] msg = System.Text.Encoding.ASCII.GetBytes(data);

// Send back a response.
stream.Write(msg, 0, msg.Length);
Console.WriteLine("Sent: {0}", data);
}

// Shutdown and end connection
client.Close();
}
}
catch (SocketException e)
{
Console.WriteLine("SocketException: {0}", e);
}
finally
{
// Stop listening for new clients.
server.Stop();
}

Console.WriteLine("\nHit enter to continue...");
Console.Read();
}
}
}

TCPClient – As the name suggest it will be used to create the client that will connect to our server.

using System;
using System.Collections.Generic;
using System.Linq;
using System.Net;
using System.Net.Sockets;
using System.Text;
using System.Threading.Tasks;

namespace TCPListen
{
class Program
{
static void Main(string[] args)
{
TcpListener server = null;
try
{
// Set the TcpListener on port 13000.
Int32 port = 13000;
IPAddress localAddr = IPAddress.Parse("127.0.0.1");

// TcpListener server = new TcpListener(port);
server = new TcpListener(localAddr, port);

// Start listening for client requests.
server.Start();

// Buffer for reading data
Byte[] bytes = new Byte[256];
String data = null;

// Enter the listening loop.
while (true)
{
Console.Write("Waiting for a connection... ");

// Perform a blocking call to accept requests.
// You could also user server.AcceptSocket() here.
TcpClient client = server.AcceptTcpClient();
Console.WriteLine("Connected!");

data = null;

// Get a stream object for reading and writing
NetworkStream stream = client.GetStream();

int i;

// Loop to receive all the data sent by the client.
while ((i = stream.Read(bytes, 0, bytes.Length)) != 0)
{
// Translate data bytes to a ASCII string.
data = System.Text.Encoding.ASCII.GetString(bytes, 0, i);
Console.WriteLine("Received: {0}", data);

// Process the data sent by the client.
data = data.ToUpper();

byte[] msg = System.Text.Encoding.ASCII.GetBytes(data);

// Send back a response.
stream.Write(msg, 0, msg.Length);
Console.WriteLine("Sent: {0}", data);
}

// Shutdown and end connection
client.Close();
}
}
catch (SocketException e)
{
Console.WriteLine("SocketException: {0}", e);
}
finally
{
// Stop listening for new clients.
server.Stop();
}

Console.WriteLine("\nHit enter to continue...");
Console.Read();
}
}
}

God Bless!

Thanks,
Thomie